How do you use the Makkelijke Moestuin app?
Download the app, create an account, add your raised bed(s), and start sowing. Follow the notification steps and you'll garden like a real pro.
This page has two parts:
This page has two parts:
- a detailed explanation of how the app works in general
- specific questions
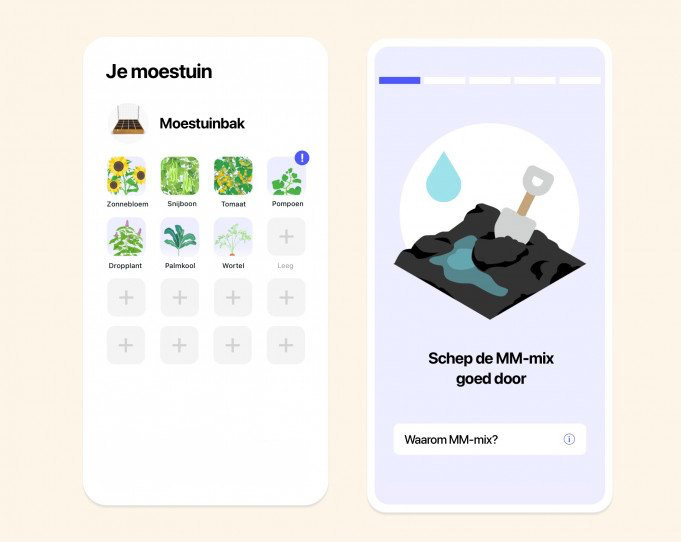
The app helps you sow, take care of, and harvest your plants - all in real-time.
The app sends you a notification when it's time for the next step and
The app sends you a notification when it's time for the next step and
- helps you check if everything is going well
- gives you step-by-step instructions about what you need to do
- counts down the days until the next step for you
Curious to see what that looks like in practice? Then I'll walk you through it:

How do you set up the app for your vegetable garden?
If you use apps a lot, you probably don't need this explanation. Most of it is self-explanatory.
What is good to know is that this app is 100% tailored to the Makkelijke Moestuin system, materials, and seeds. Not sure whether the app is right for you? Then read this page first.
Okay, for anyone who likes a detailed user guide:
What is good to know is that this app is 100% tailored to the Makkelijke Moestuin system, materials, and seeds. Not sure whether the app is right for you? Then read this page first.
Okay, for anyone who likes a detailed user guide:
Step 1: Download the app
There are currently two versions. They work the same way, but were built for two different operating systems:
The iOS version for iPhone and iPad
Download here
And the Android version
Download here
The iOS version for iPhone and iPad
Download here
And the Android version
Download here
Step 2: Create an account
Once you open the app, you have three choices: sign in with Apple, Google, or your own email address. If you have not created an account with your email address yet, you can register with it. If you already have an account with your email address, you can log in with the matching password.
Can't log in or register?
Go to the Errors & problems page
Can't log in or register?
Go to the Errors & problems page
Step 3: Add your vegetable garden to the app
You can add your raised beds to the app in 2 ways:
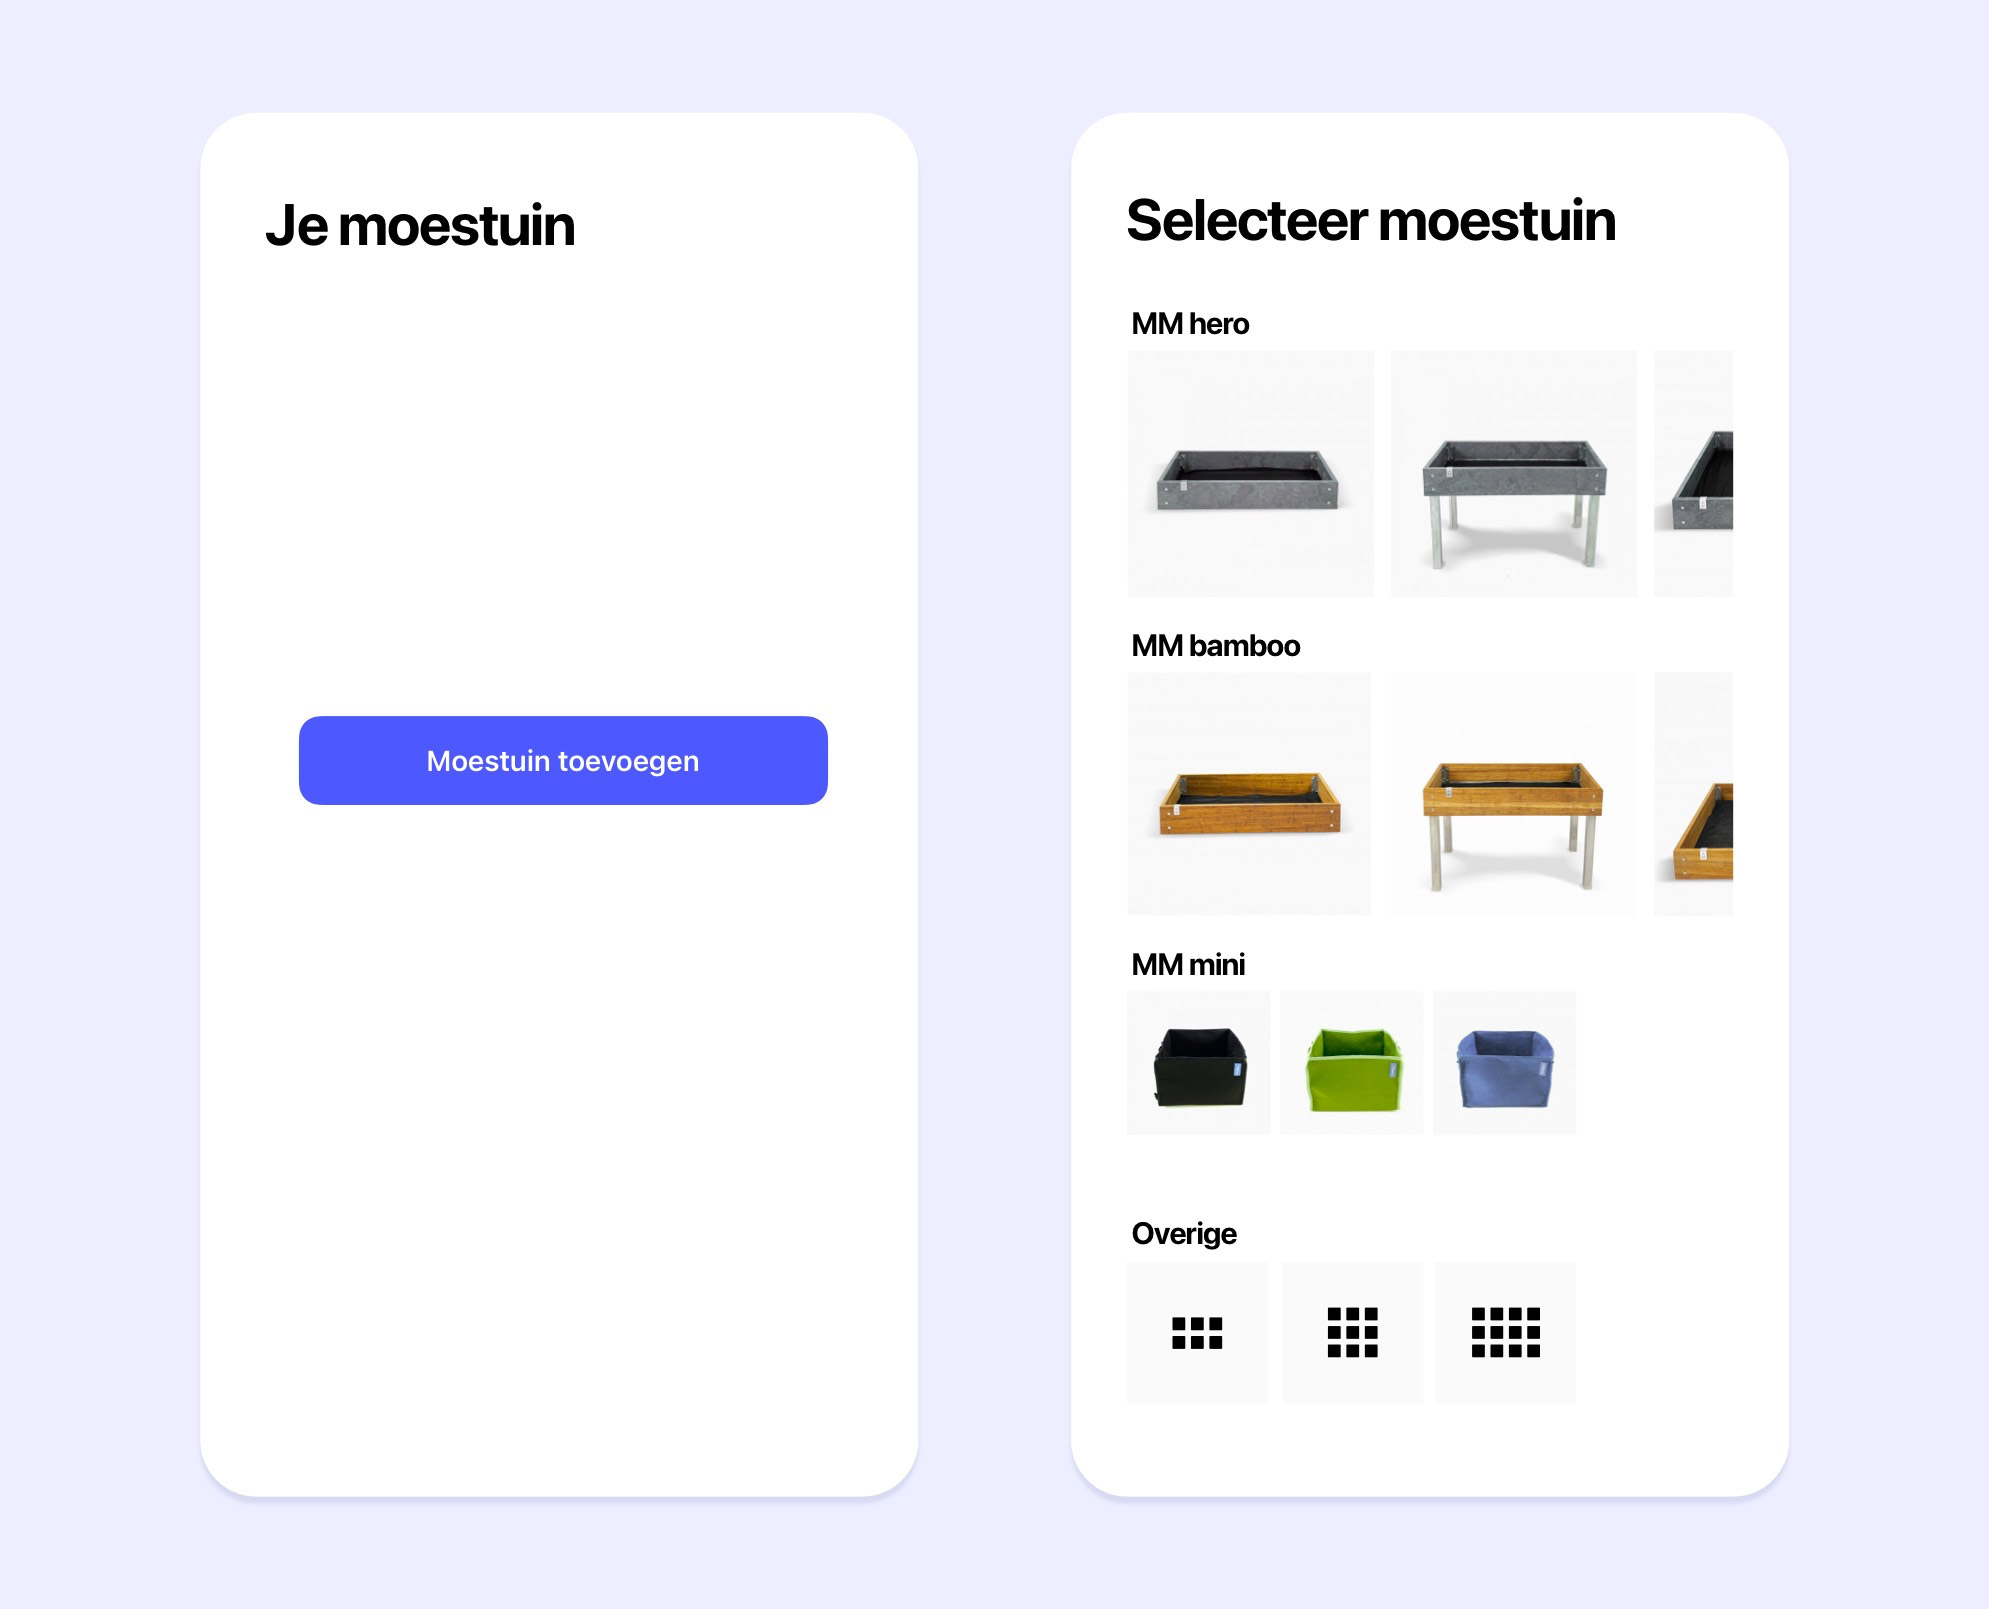
- At the top of the 'Today' screen, tap the 'Add garden' button.
- At the bottom of the screen, tap the middle tab 'Your garden'. If you haven't added a raised bed yet, you'll see an empty screen with the same button.
Select your raised bed or grow bag
All our current raised beds and grow bags are in the app, along with a number of older products and extra sizes.
Note: There are raised beds with and without legs and/or a trellis. Choose the version you have, because only then will you get the right advice when choosing your plants.
Give your raised bed a name
Be creative, but practical.
Is your raised bed a different size?
You can solve that by combining several raised beds. For a 180 x 90 bed, for example, enter two 90 x 90 beds; for a 120 x 150 bed, use a 120 x 60 bed and a 120 x 90 bed.
Tip: give those beds a clear name so you remember which bed is which part. For example 'kitchen-left' and 'kitchen-right'.
All our current raised beds and grow bags are in the app, along with a number of older products and extra sizes.
Note: There are raised beds with and without legs and/or a trellis. Choose the version you have, because only then will you get the right advice when choosing your plants.
Give your raised bed a name
Be creative, but practical.
Is your raised bed a different size?
You can solve that by combining several raised beds. For a 180 x 90 bed, for example, enter two 90 x 90 beds; for a 120 x 150 bed, use a 120 x 60 bed and a 120 x 90 bed.
Tip: give those beds a clear name so you remember which bed is which part. For example 'kitchen-left' and 'kitchen-right'.
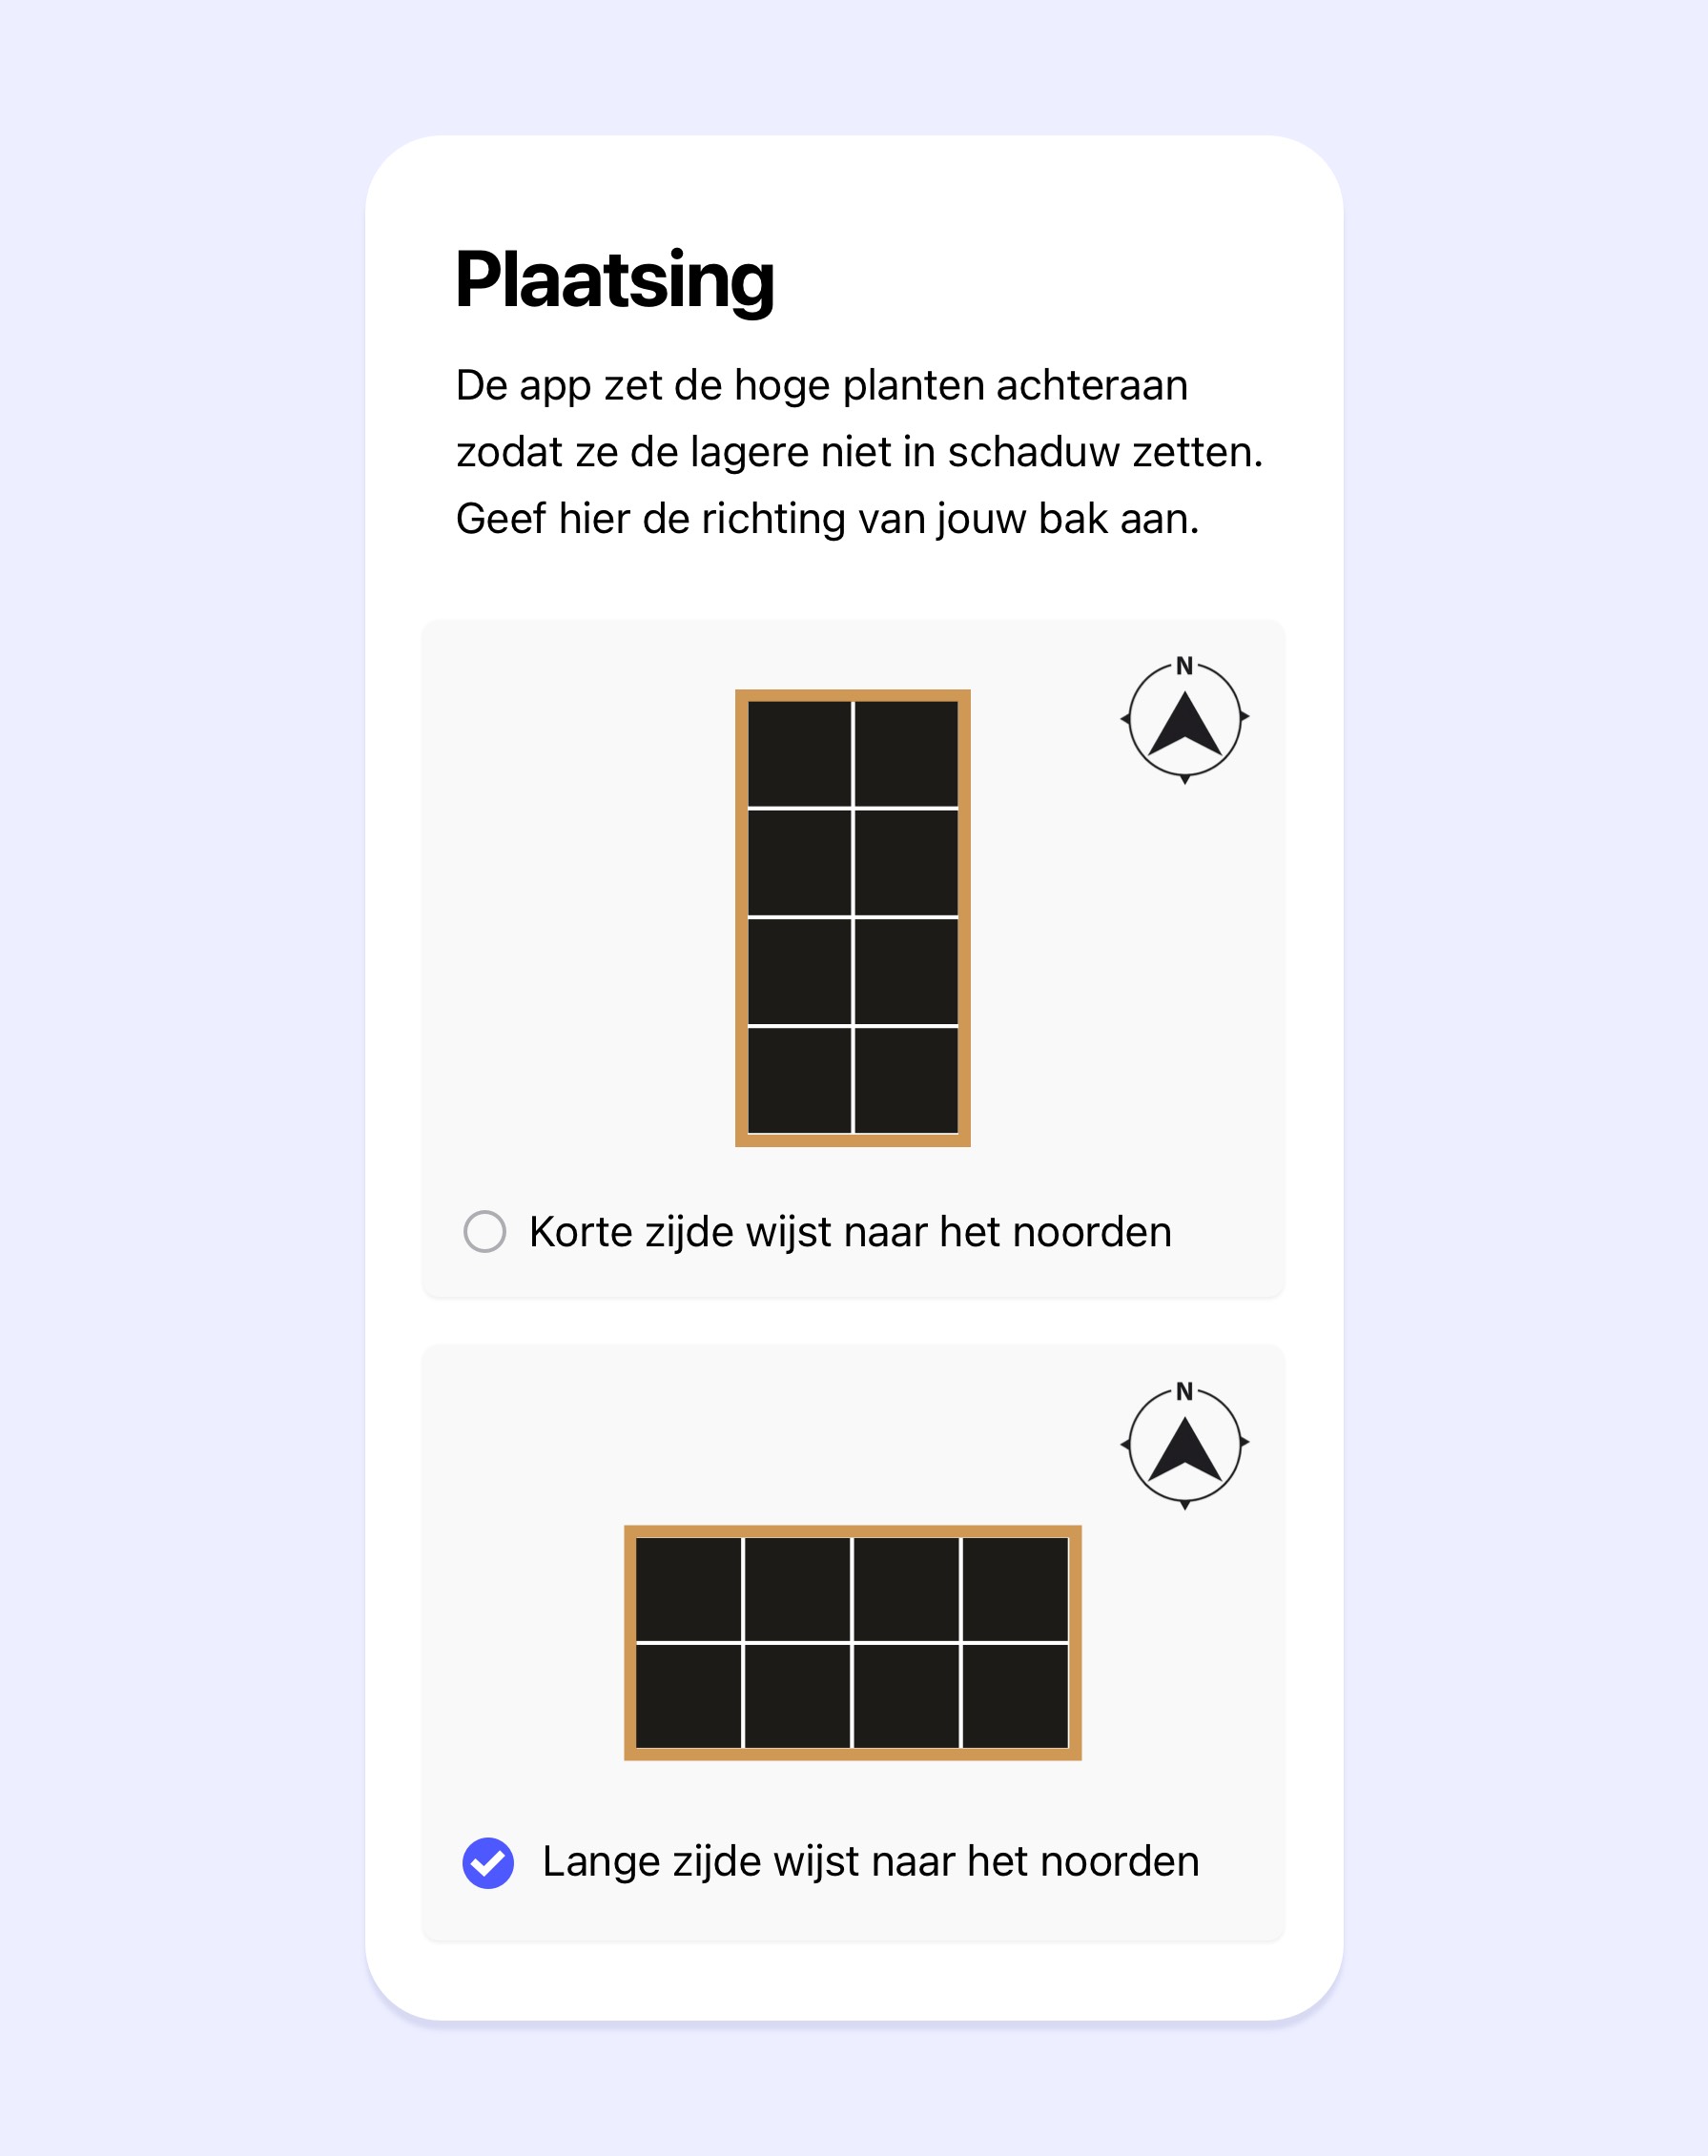
Placement
Make sure your raised bed is positioned in your garden exactly as it is in the app: with the front facing south, because that's where the sunlight comes from. The squares at the front of your raised bed are therefore the bottom ones in the app. You may need to turn a rectangular raised bed around.
Make sure your raised bed is positioned in your garden exactly as it is in the app: with the front facing south, because that's where the sunlight comes from. The squares at the front of your raised bed are therefore the bottom ones in the app. You may need to turn a rectangular raised bed around.
Step 4: Getting started 💪
You sow your squares one by one. You do that in the app and in your actual raised bed.
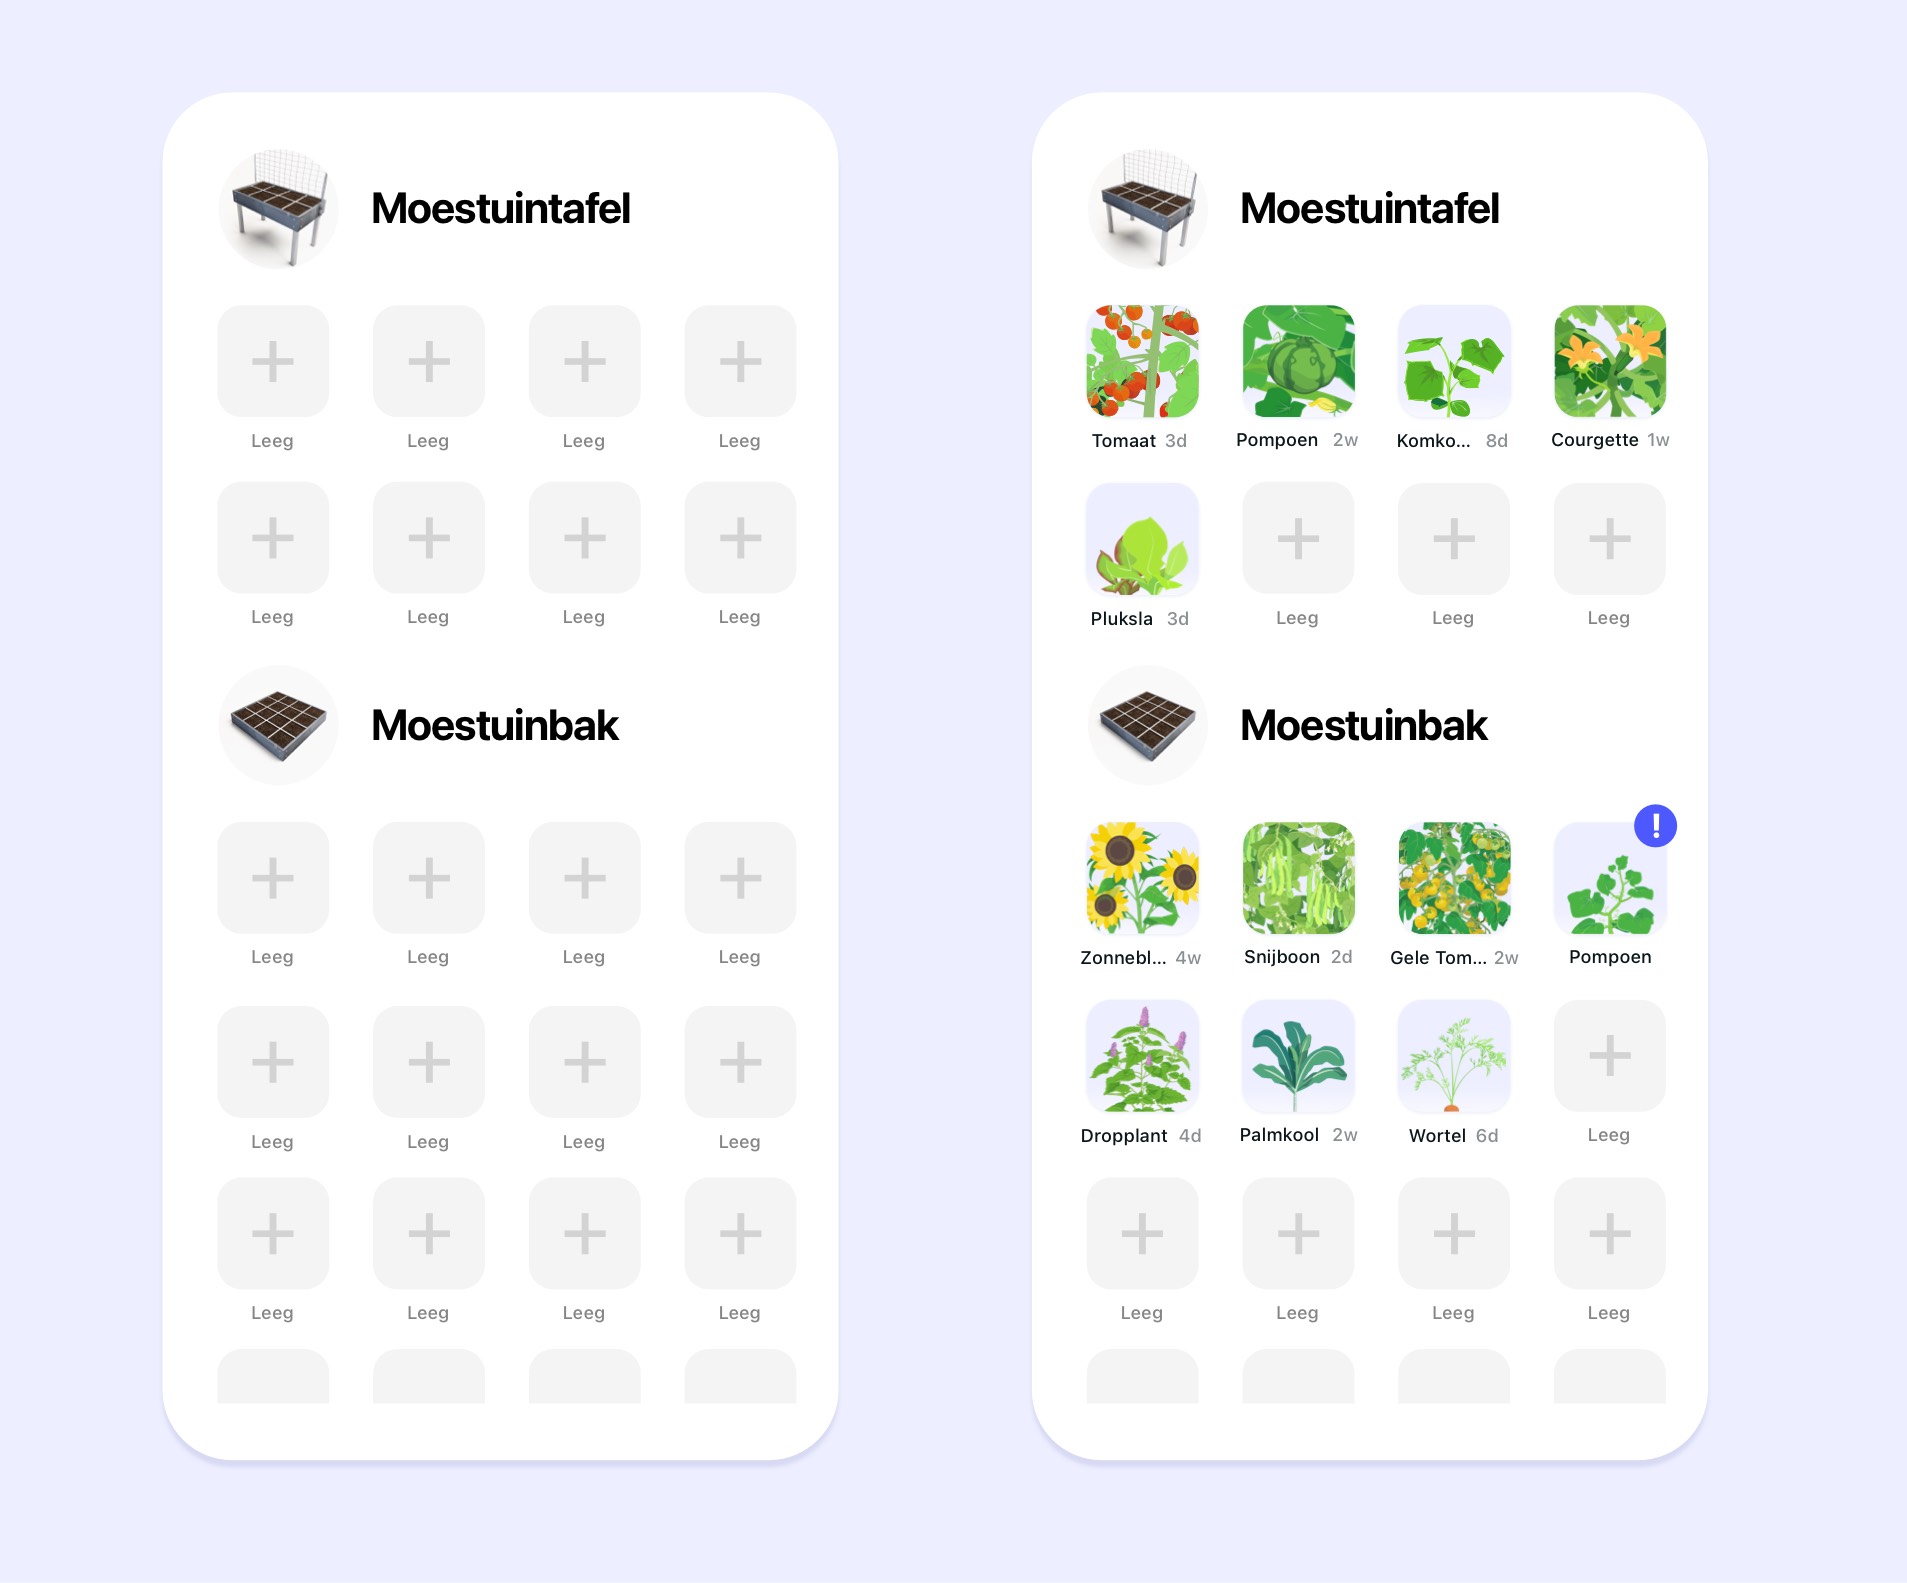
This is how you sow your squares:
1. Choose a square
In the 'Your garden' tab, you'll now see your raised bed or grow bag. It has one or more squares. In the app, an empty square is grey with a plus sign in it. Tap the plus to start sowing.
1. Choose a square
In the 'Your garden' tab, you'll now see your raised bed or grow bag. It has one or more squares. In the app, an empty square is grey with a plus sign in it. Tap the plus to start sowing.
2. Select your vegetable
In the overview, you'll see all our seeds. At the top are the varieties that suit that square best at that moment. For the front squares, those are lower-growing plants than for the back squares.
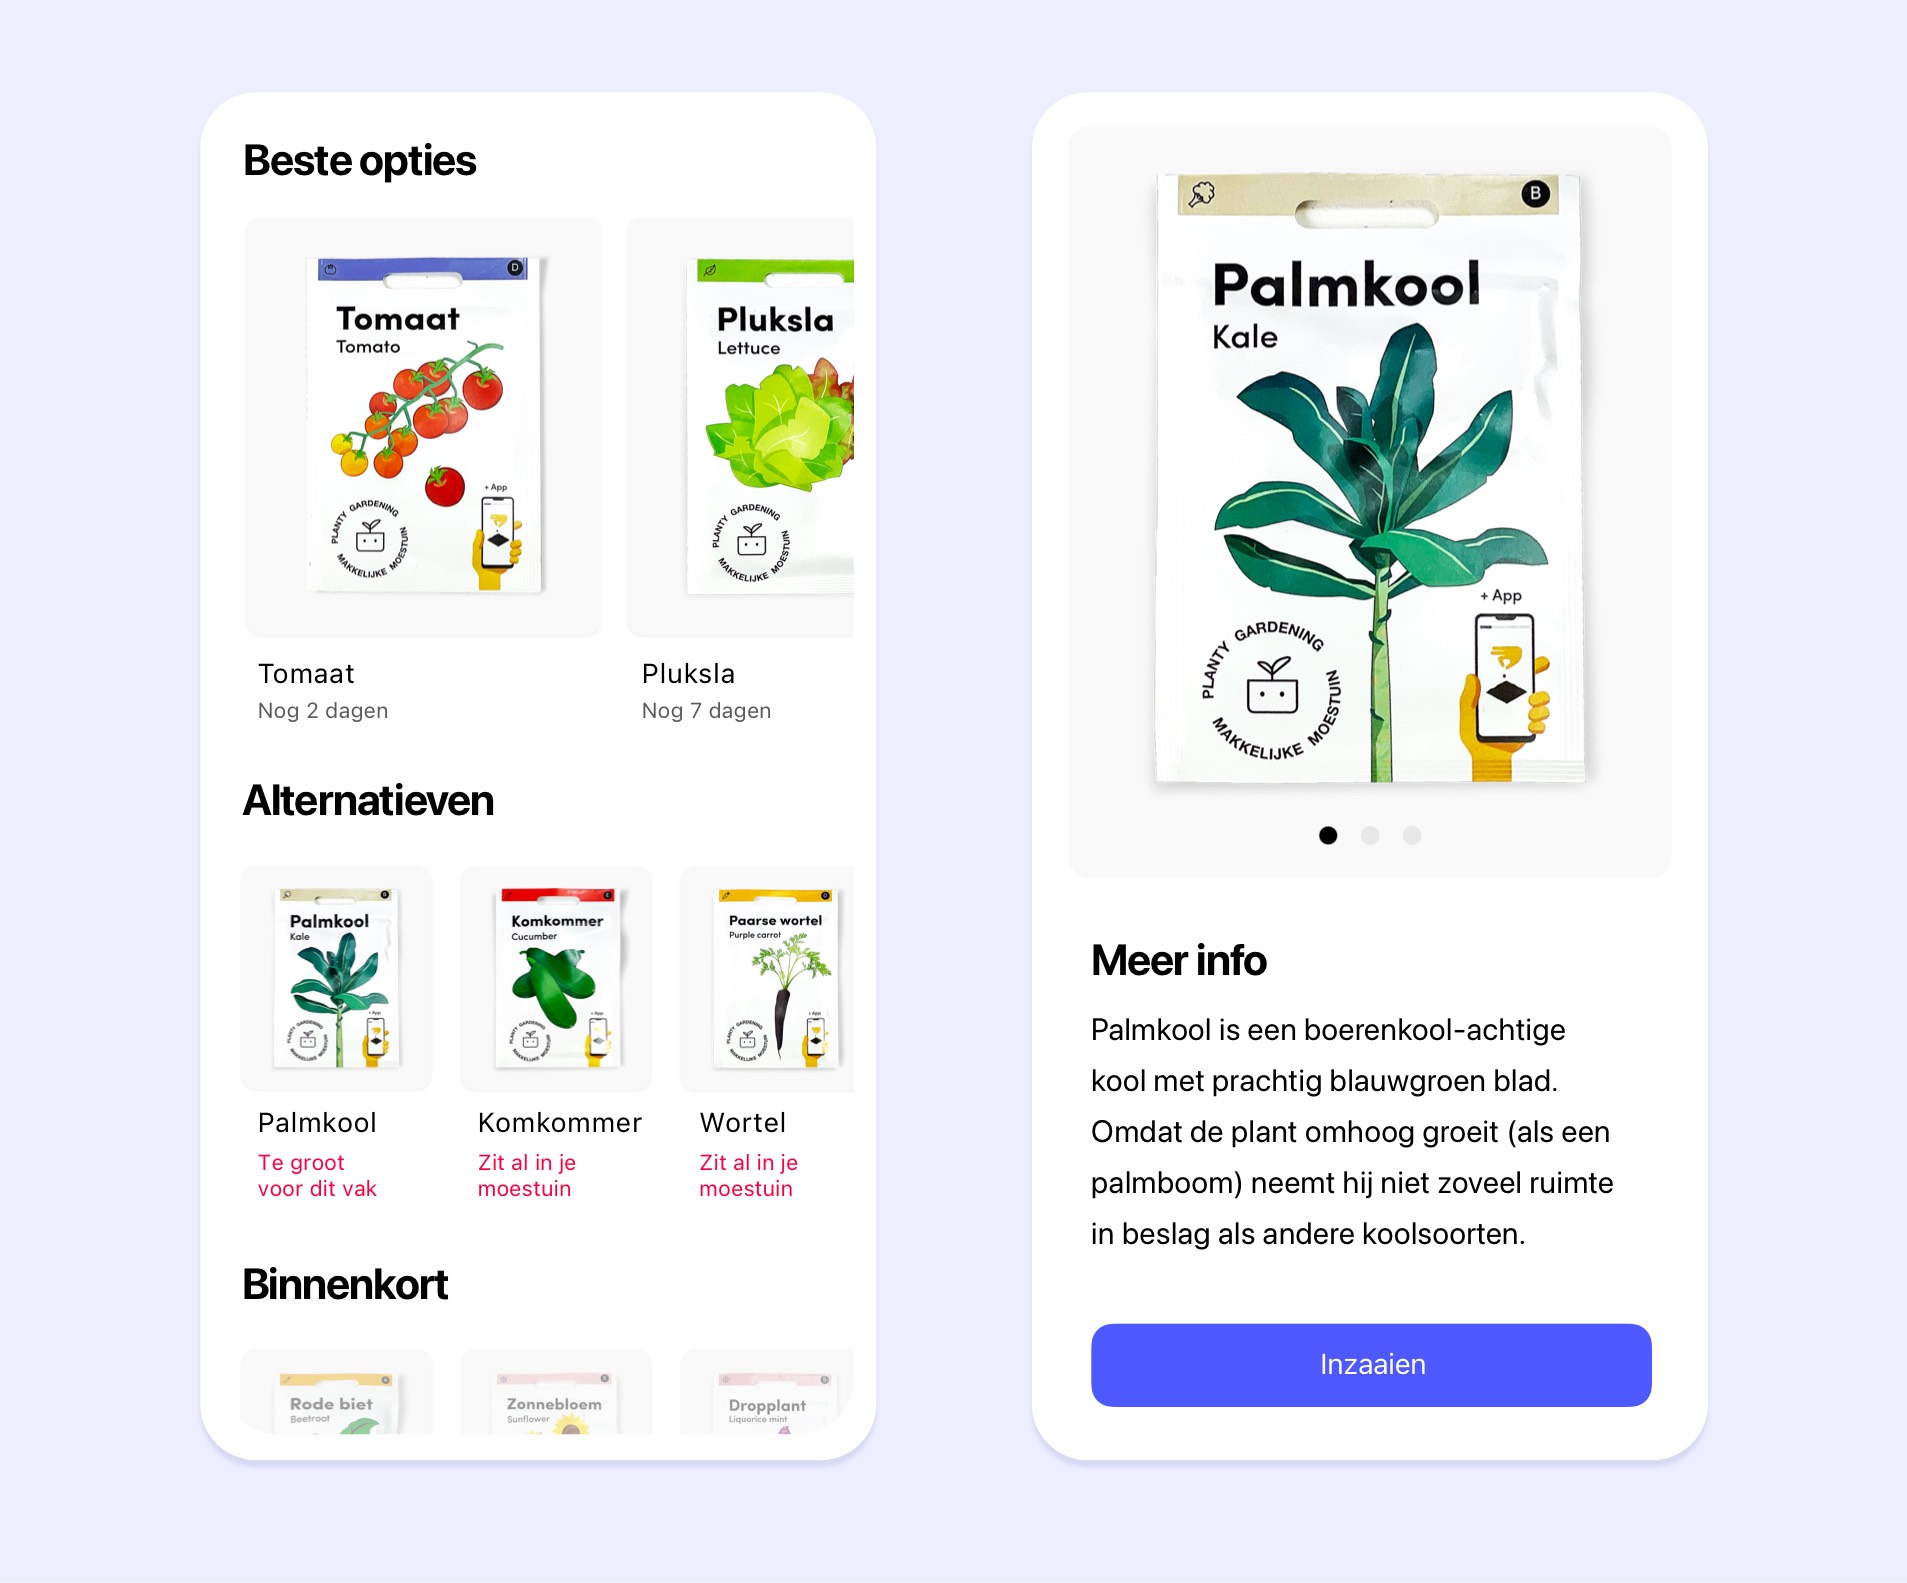
Below that are the other seeds. You'll also see why they are not ideal: maybe it is not the right time yet, maybe it is not the best spot, or there is another reason. You can still choose them, but then you are going against the app's advice.
The app works one-to-one with Makkelijke Moestuin seeds. We sell vegetables, herbs, and flowers. The more varieties you have, the more you can sow throughout the year and the more varied your harvest will be.
Read more about the seeds
For Makkelijke Moestuin seeds, all stages are included in the app. For other vegetables or plants, you can reserve a square, but you won't receive instructions.
The app works one-to-one with Makkelijke Moestuin seeds. We sell vegetables, herbs, and flowers. The more varieties you have, the more you can sow throughout the year and the more varied your harvest will be.
Read more about the seeds
For Makkelijke Moestuin seeds, all stages are included in the app. For other vegetables or plants, you can reserve a square, but you won't receive instructions.
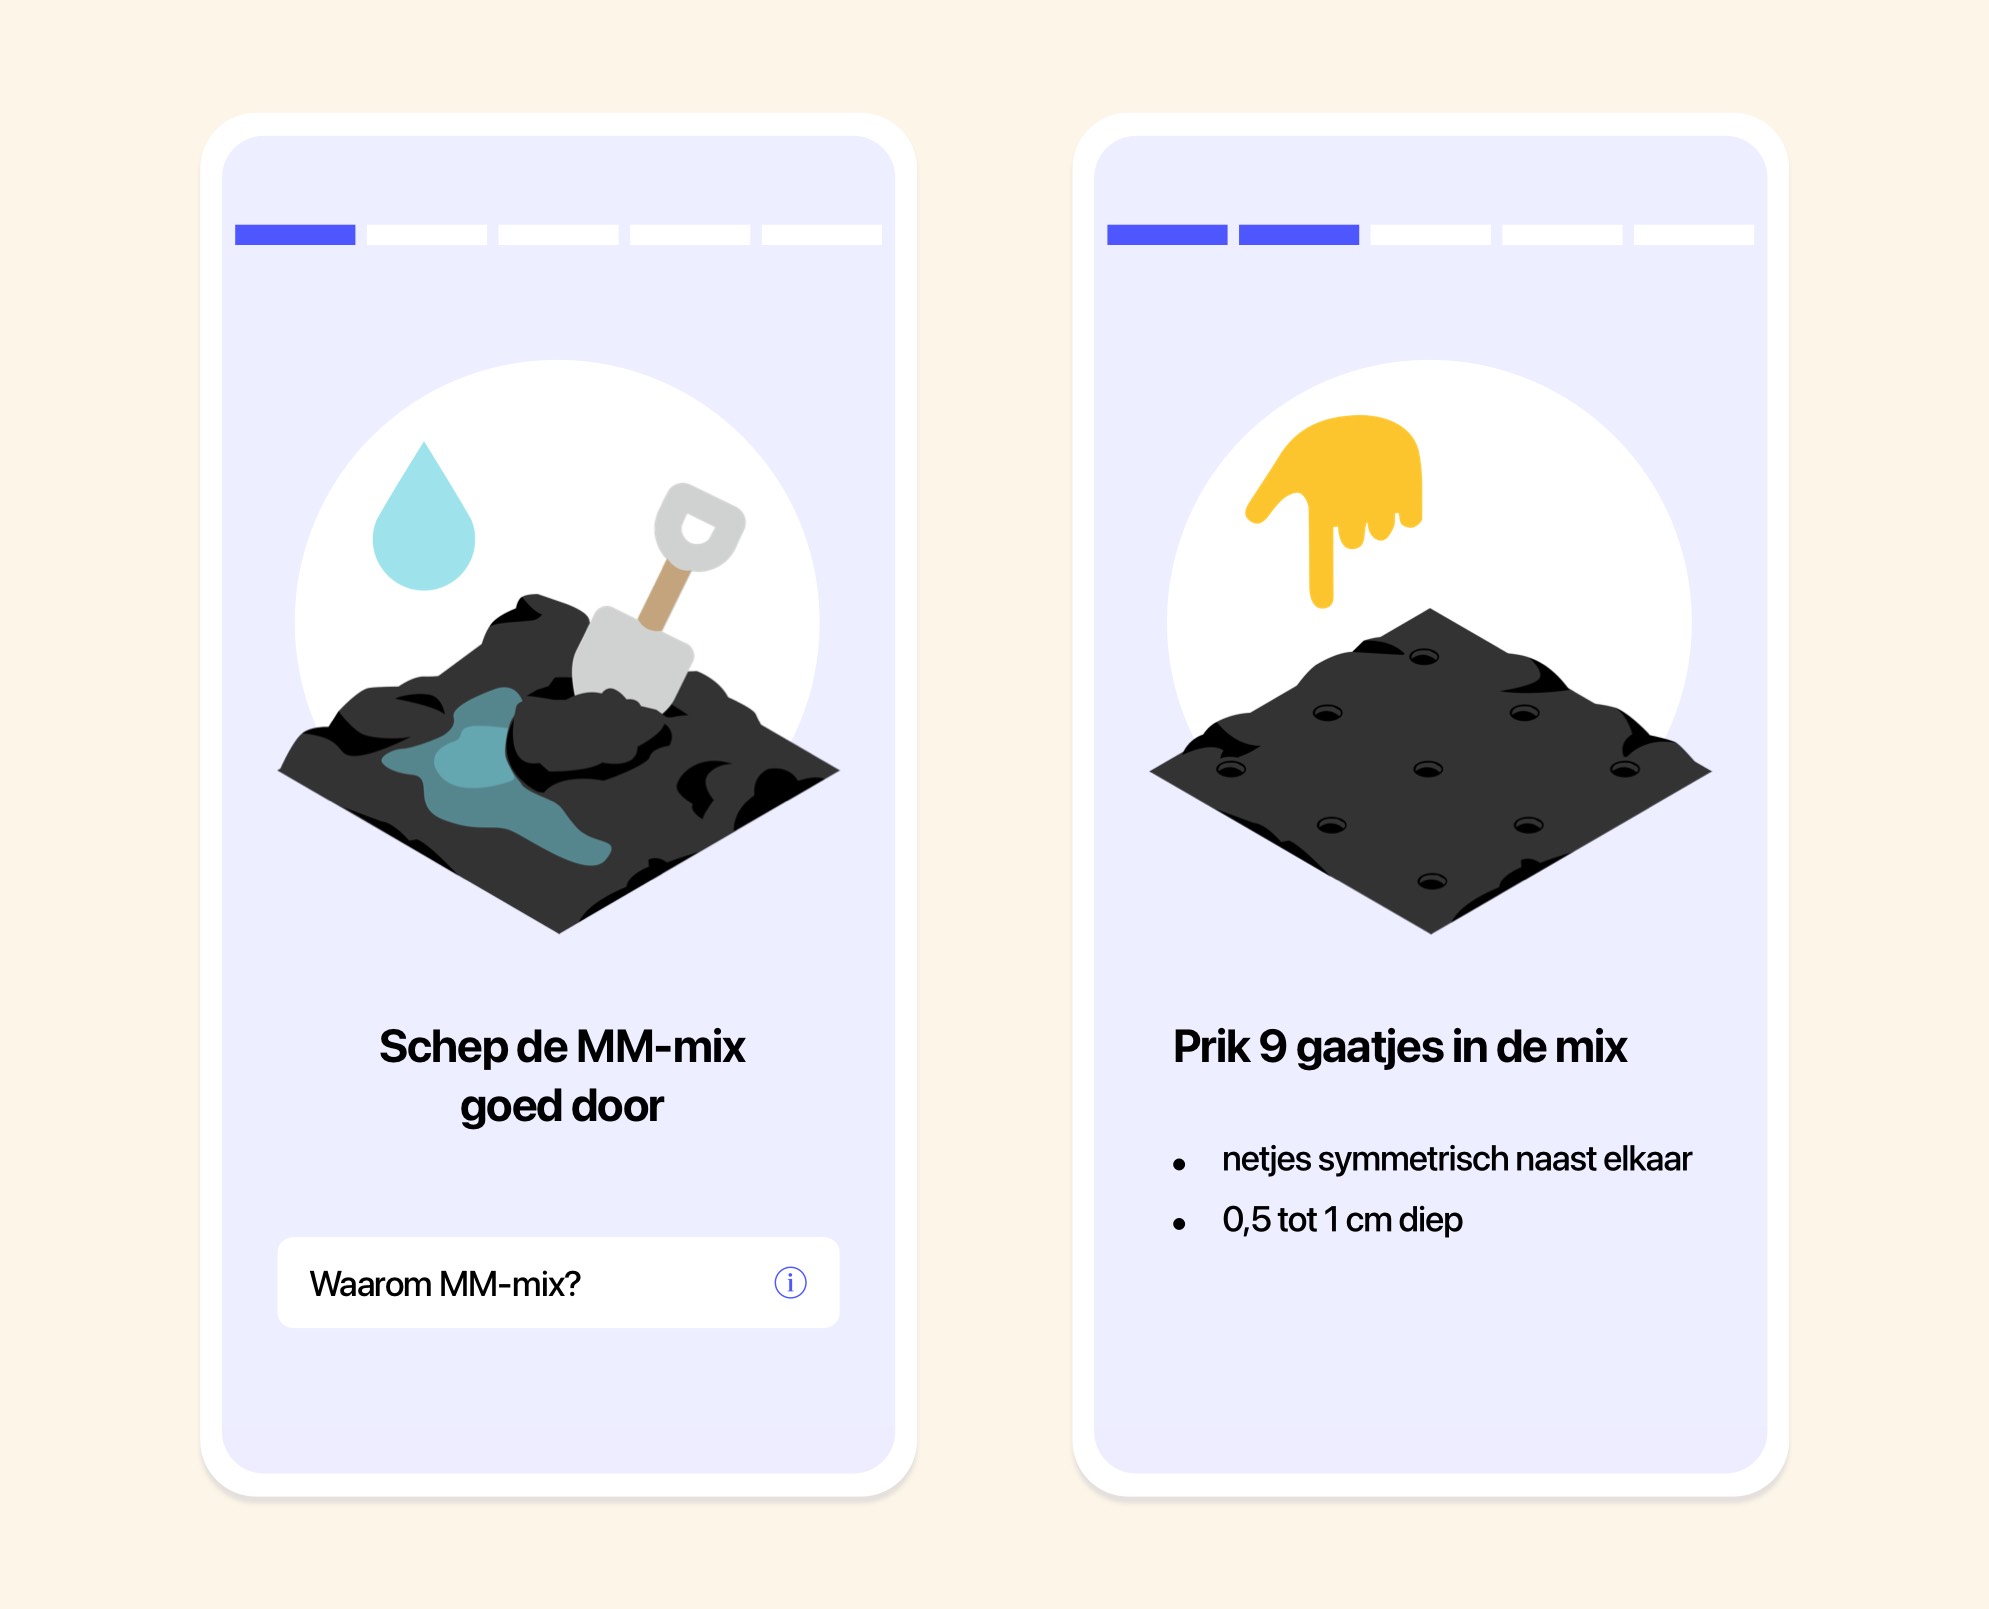
3. Follow the instructions
The rest explains itself: the app guides you step by step through sowing. Once you've done that, the square no longer shows a plus sign, but a few seeds. A timer also starts for that square.
The rest explains itself: the app guides you step by step through sowing. Once you've done that, the square no longer shows a plus sign, but a few seeds. A timer also starts for that square.
Step 5: Respond to notifications
Every few days, you'll get a notification from the app: 'One of your plants needs attention'.
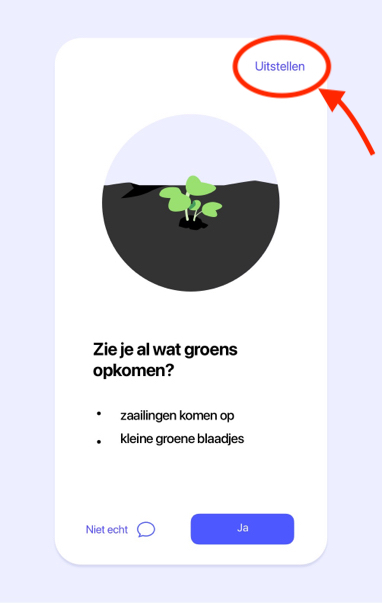
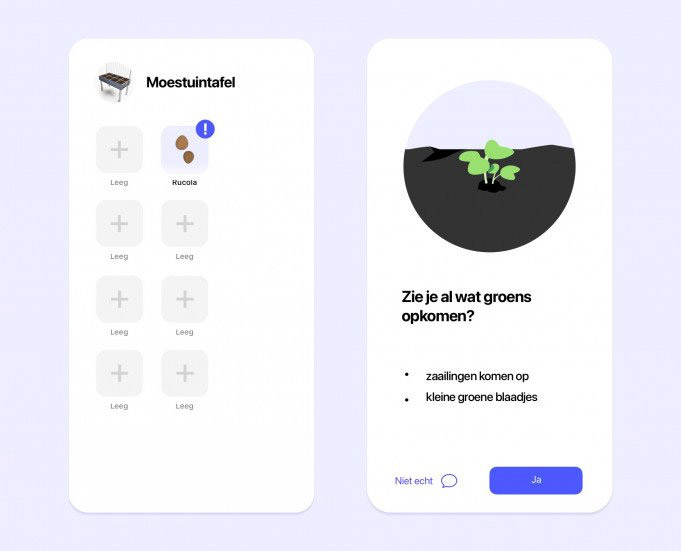
When you go to your raised bed in the app, you'll see an exclamation mark in one of the squares. Tap it and you'll get a question, for example: "Do you see anything coming up yet?" You check that in your actual raised bed.
If you do, you move on to the next level, follow the steps for that level, and the timer starts again until the next notification.
When you go to your raised bed in the app, you'll see an exclamation mark in one of the squares. Tap it and you'll get a question, for example: "Do you see anything coming up yet?" You check that in your actual raised bed.
If you do, you move on to the next level, follow the steps for that level, and the timer starts again until the next notification.
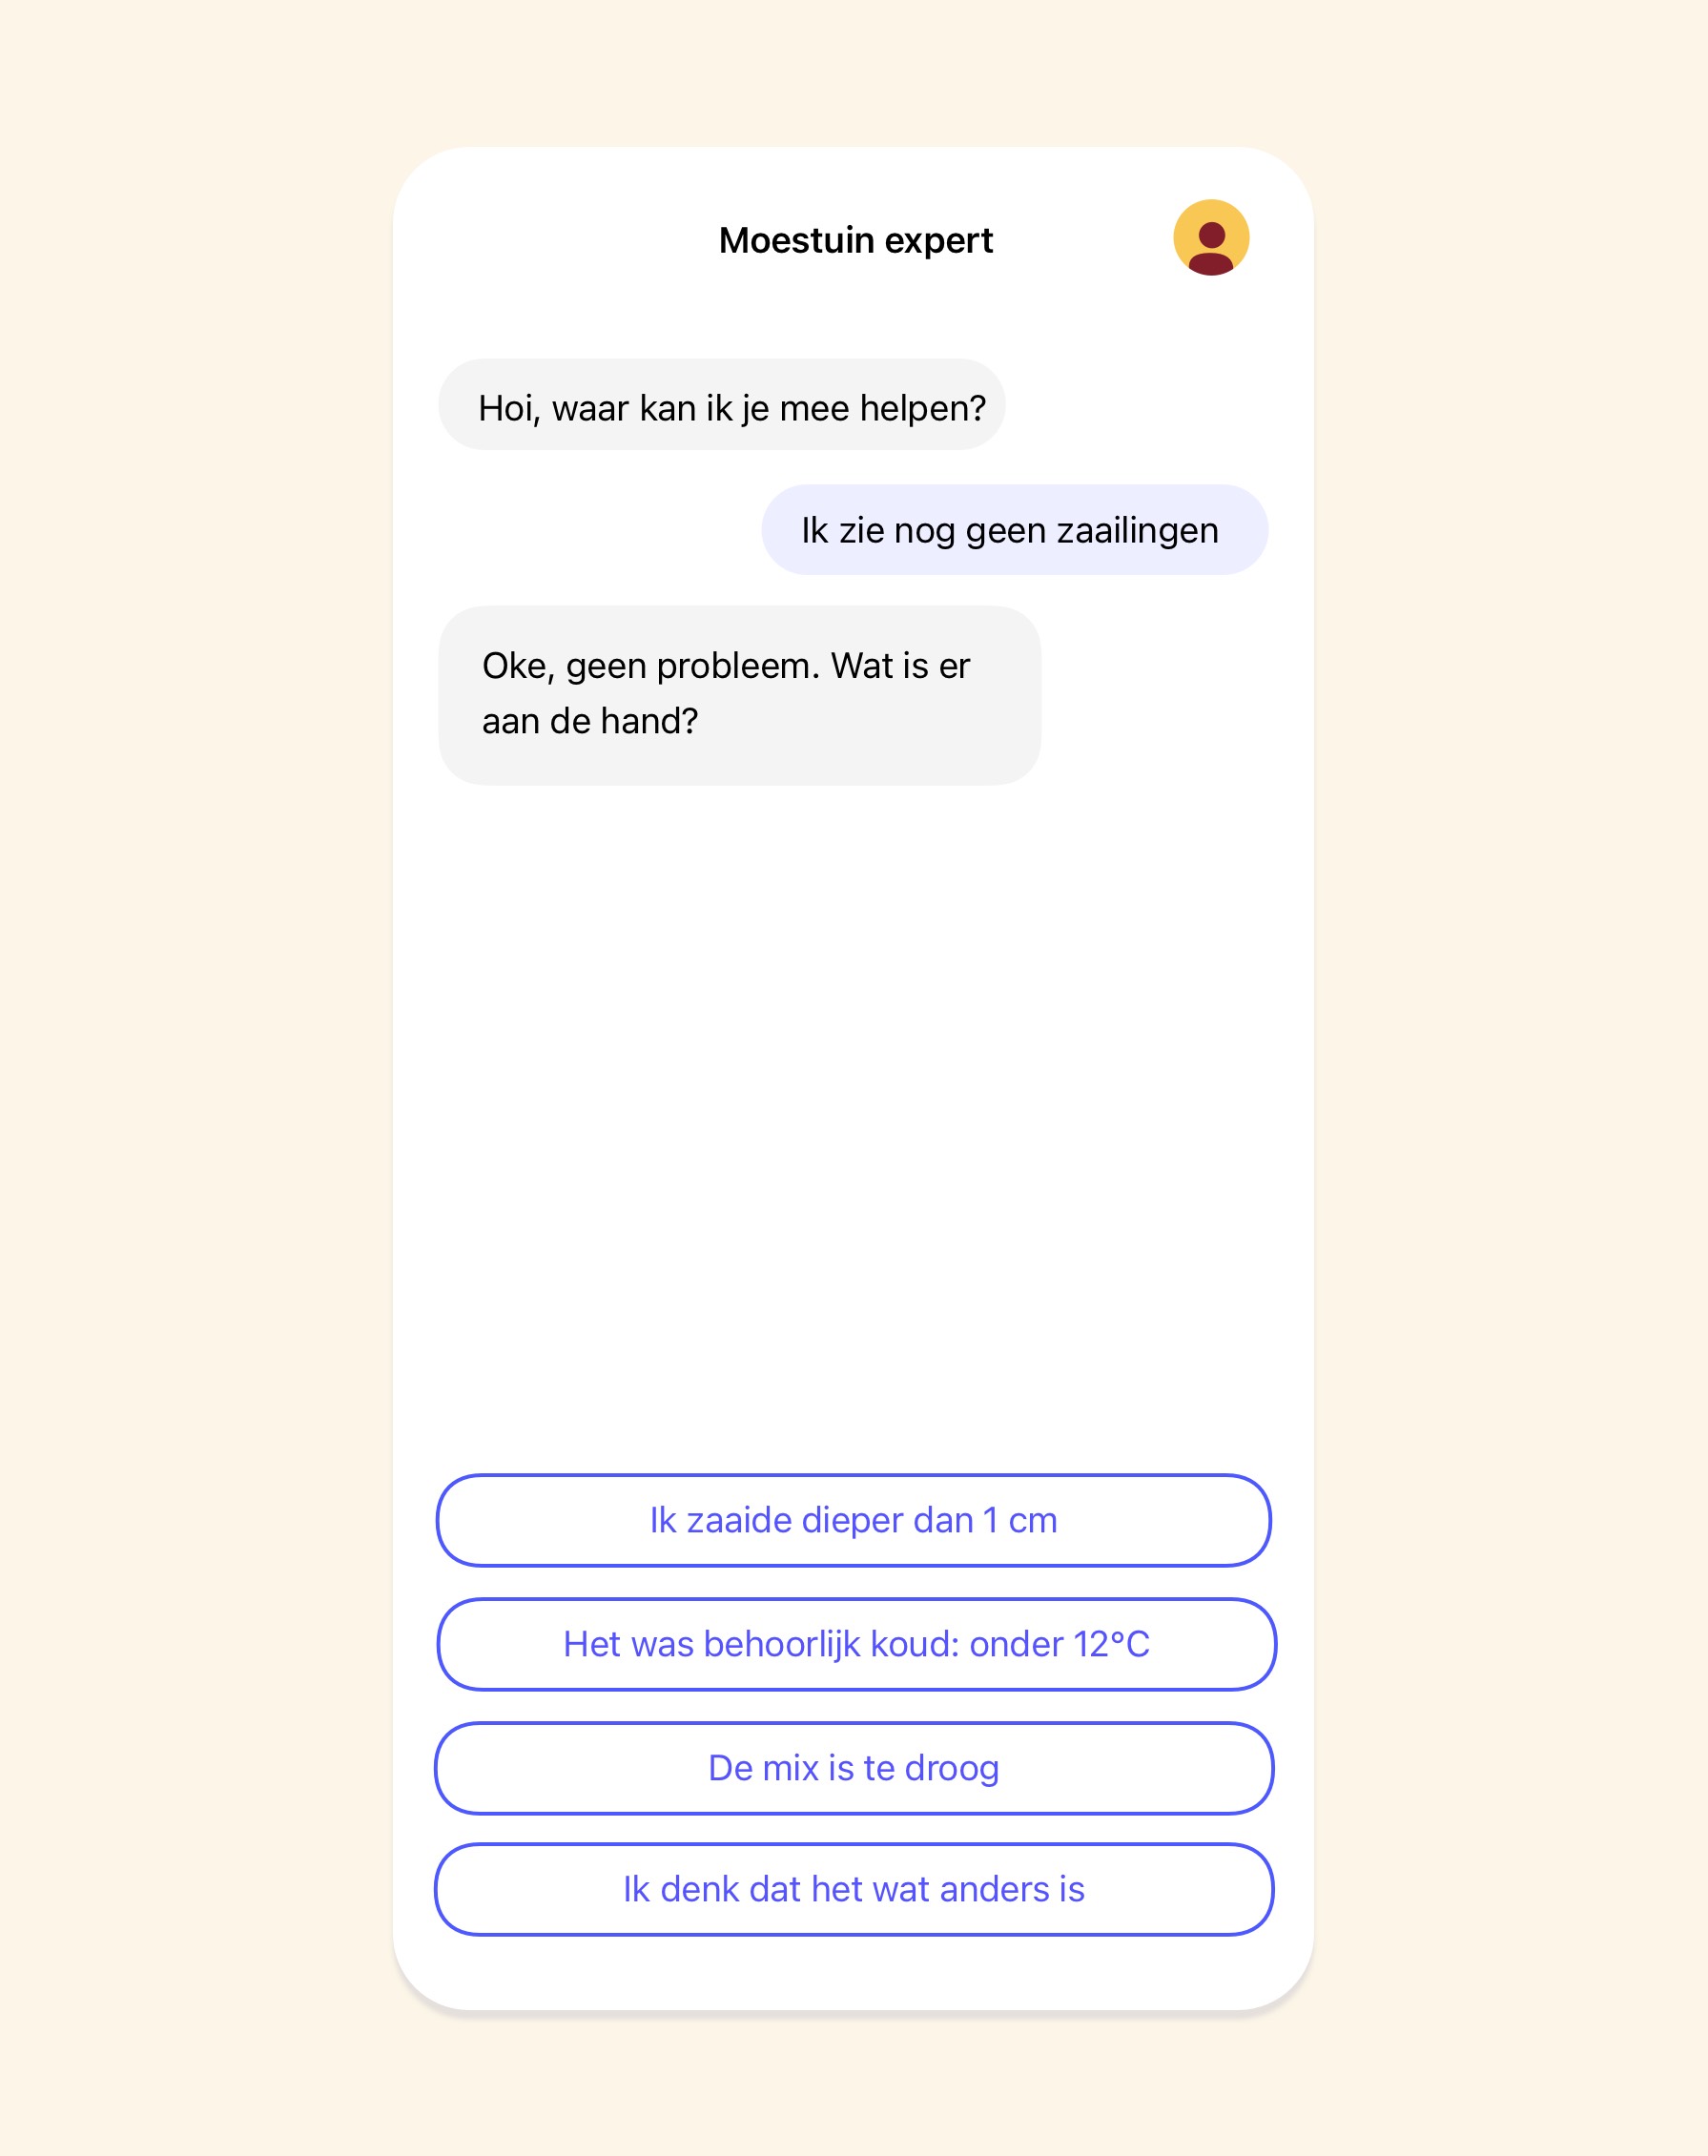
And what if something goes wrong?
Then the app works out what is going on together with you. It asks questions and gives advice based on your answers.
For each vegetable, the timer shows the average time between levels.
In good weather, your plants will grow faster and you can tap through to the next level sooner. If the weather is disappointing, or if it is still early spring or late autumn, you'll say no more often and the timer will add a few extra days.
In good weather, your plants will grow faster and you can tap through to the next level sooner. If the weather is disappointing, or if it is still early spring or late autumn, you'll say no more often and the timer will add a few extra days.
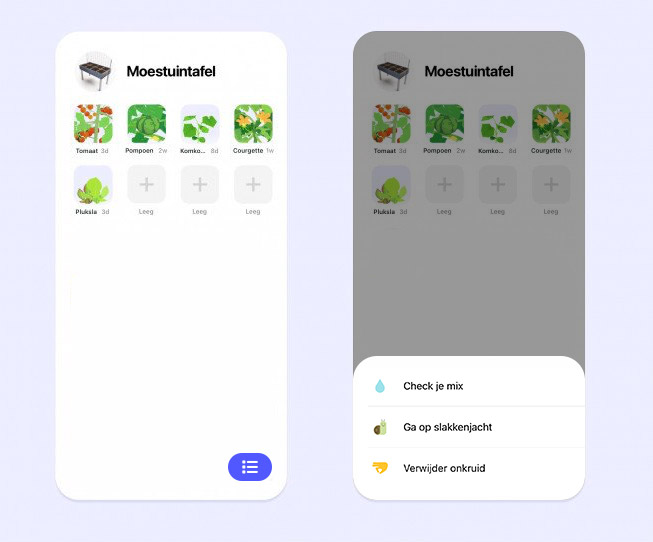
Daily to-dos
You'll also get regular to-dos.
They remind you to water, go on a slug hunt, and other things like that. You can find them with the button at the bottom of your garden:
They remind you to water, go on a slug hunt, and other things like that. You can find them with the button at the bottom of your garden:
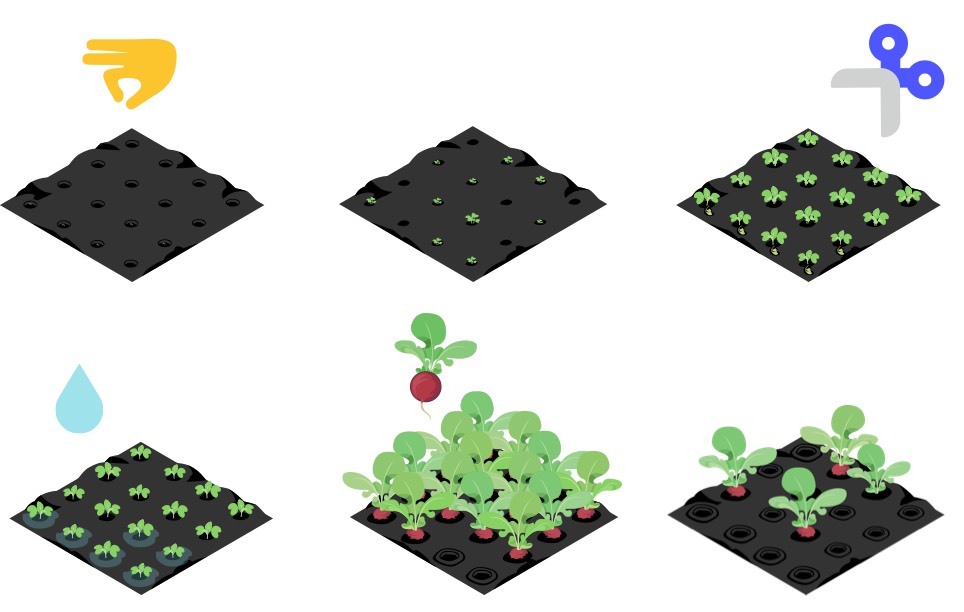
Will you be drowning in notifications?
Not really. Radishes go through 6 stages. That means you'll get 6 to 8 notifications over a 5-6 week period.
Tomatoes have a few more, because you start them indoors first, grow them into seedlings indoors, harden them off outside, and then plant them out in your raised bed. The app shows you all of it.
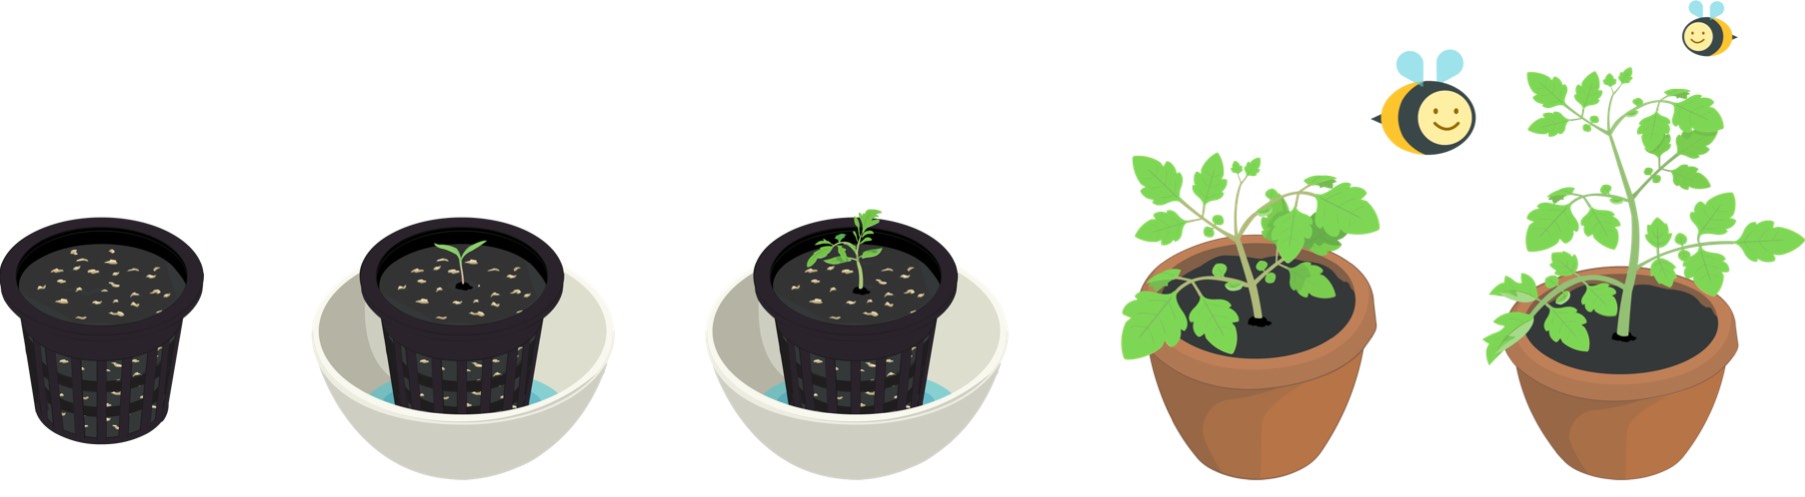
It even shows you how to remove side shoots, also known as suckers, and what to do at the end of the season with tomatoes that are not quite ripe yet.
All in all, you learn in one season how to grow all our vegetables and herbs. At least, if you put them all in your raised beds 😉
All in all, you learn in one season how to grow all our vegetables and herbs. At least, if you put them all in your raised beds 😉
After a while, you're a fully fledged MM gardener
After a few months, you'll have learned so much that you won't even need the app's notifications anymore. Then you'll mainly use the app to choose your vegetables, or to see what you can still sow at that moment.
Or to post something in the community or read what others are sharing. Because you'll find that in the app too 🙂
Or to post something in the community or read what others are sharing. Because you'll find that in the app too 🙂
Frequently asked questions
Our app is used by tens of thousands of people, so of course questions come up now and then.
Below you'll find the most common questions about the features in the app.
Is your question not listed?
There are already lots of questions and solutions in the community. Yours may already be there too. If not, create a post in the community and add the category 'App-support'.
Below you'll find the most common questions about the features in the app.
Is your question not listed?
There are already lots of questions and solutions in the community. Yours may already be there too. If not, create a post in the community and add the category 'App-support'.
When you're on the screen for your garden, you'll see that each raised bed has a name. Tap it to open that raised bed's settings. On the first screen you can do three things:
- Change the type of raised bed:
tap 'Change'. For example, you can add a trellis. - Change the name of your raised bed.
- Delete your raised bed.
Tap the bin icon in the top right or the 'delete' link.
Does your raised bed have a long side and a short side?
Then there is a second screen where you can adjust the direction of your raised bed in relation to north. But be careful: if you change it when there are already plants in the bed, they will no longer be in the right spot and may shade their neighbours. Or the other way around.
Then there is a second screen where you can adjust the direction of your raised bed in relation to north. But be careful: if you change it when there are already plants in the bed, they will no longer be in the right spot and may shade their neighbours. Or the other way around.
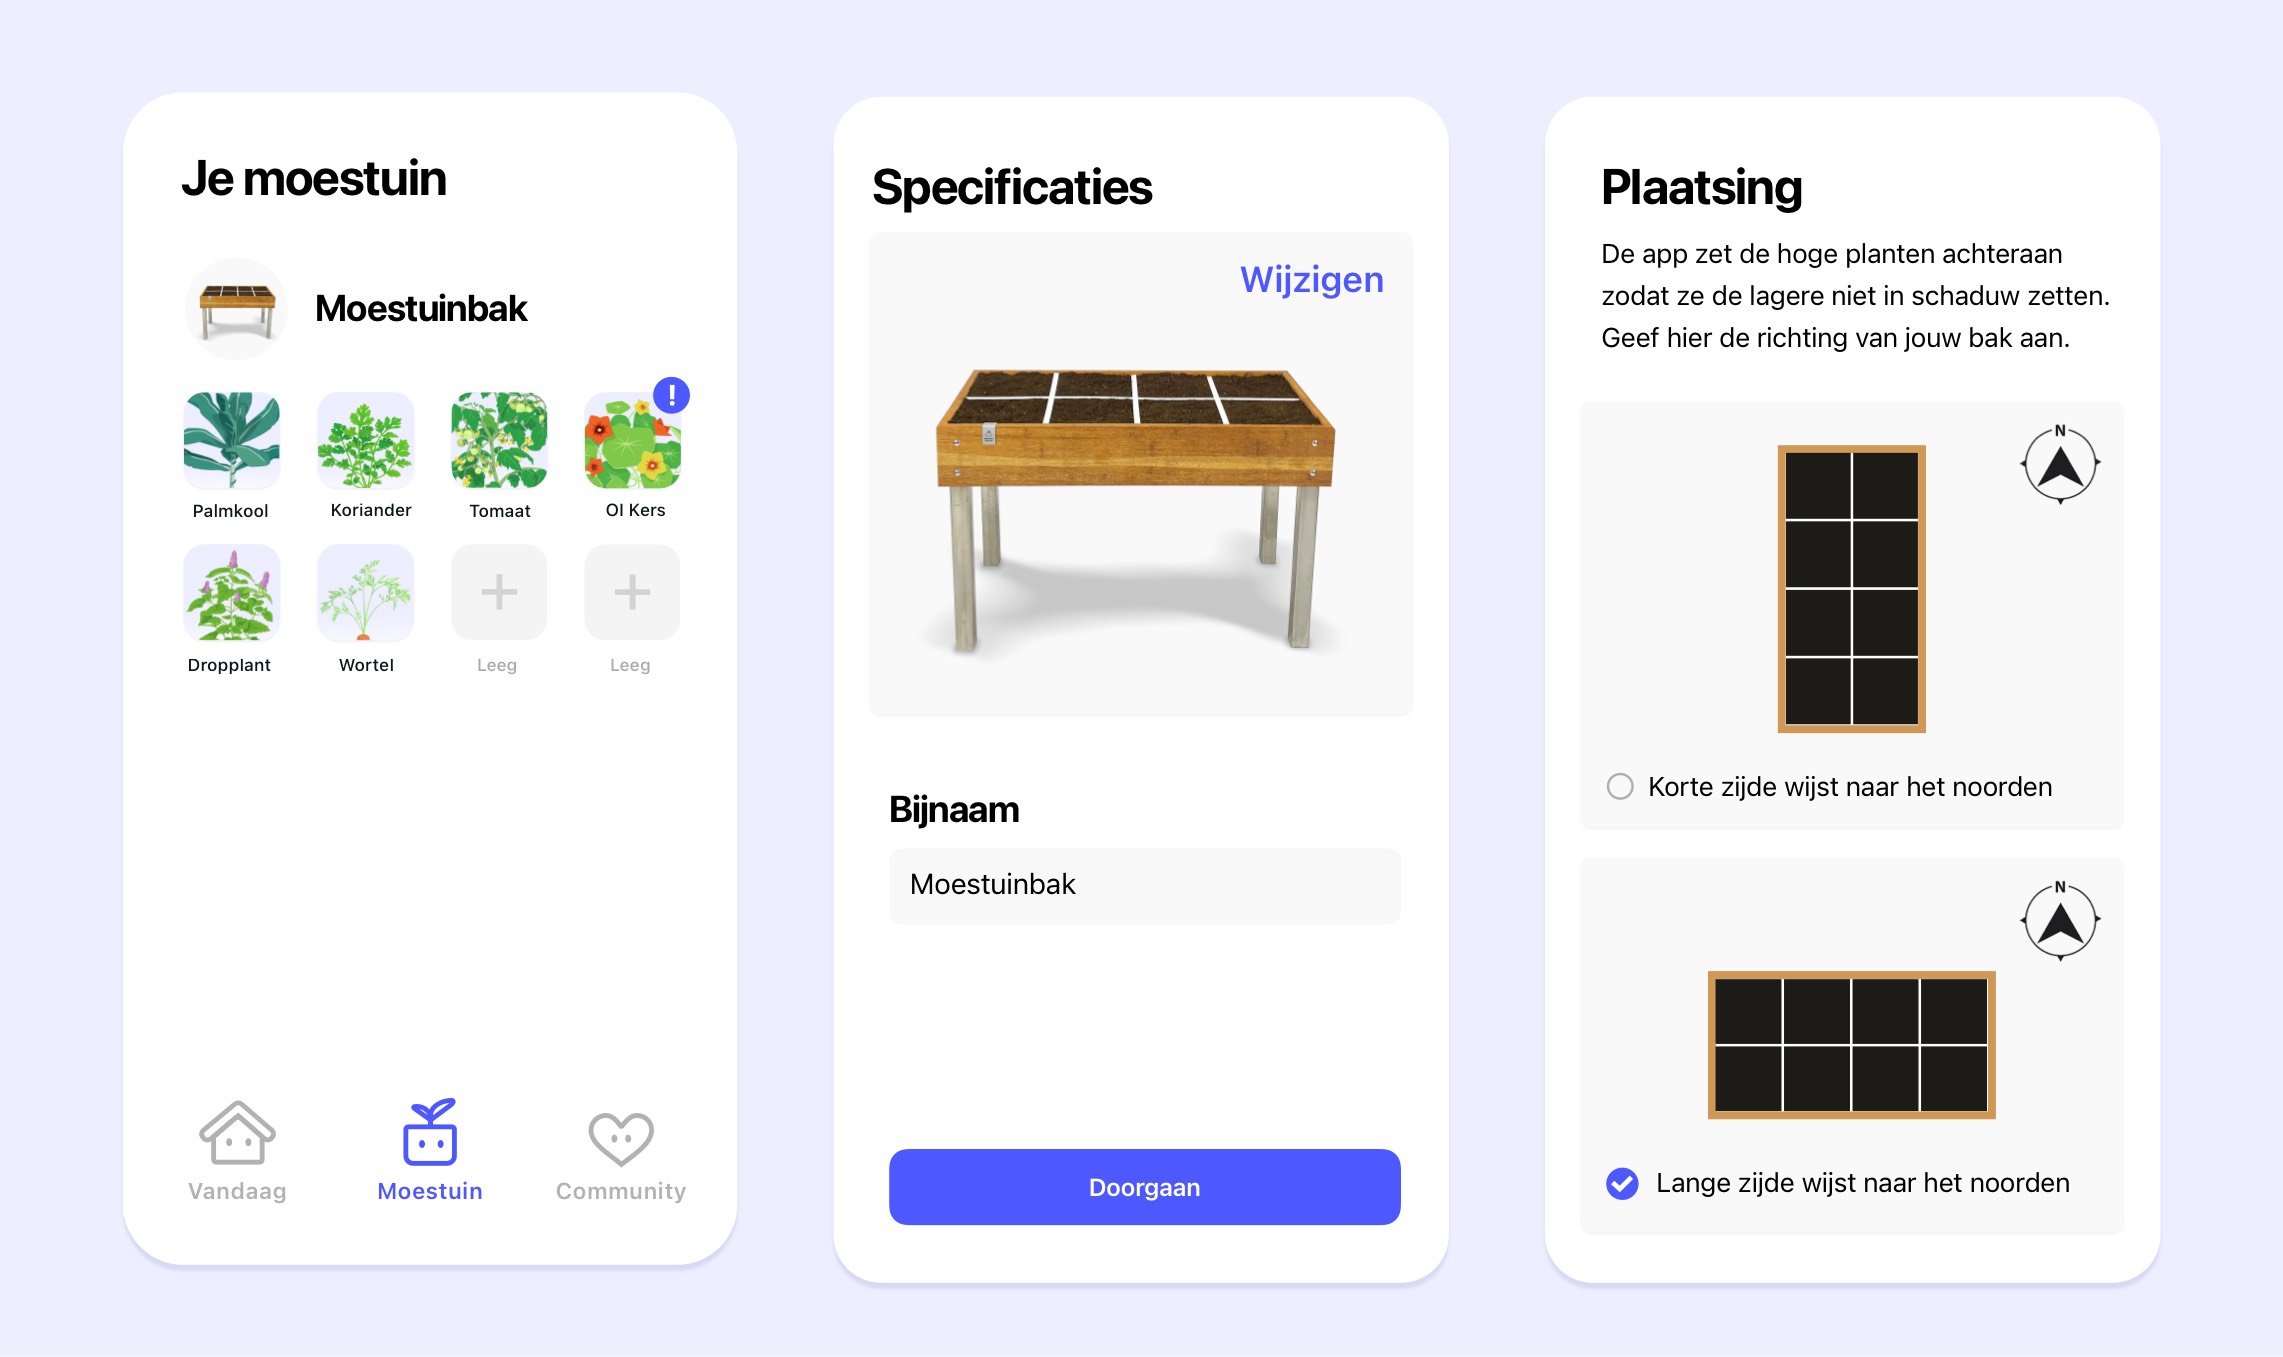
Why do you need to do this?
If you used the MM app last year too, you probably already have a few raised beds in it. Even if they are empty now, last year's data is still attached to them: for example, which vegetable was last in a square.
But in your garden, you prepare the raised beds for a new season. You scoop the mix through the whole raised bed so it becomes nice and airy again. At the same time, you top up the plant food and add some fresh mix if your raised bed is no longer completely full. By mixing everything together, you're basically starting from scratch again, so it no longer matters what was in which square last year.
How do you show this in the app?
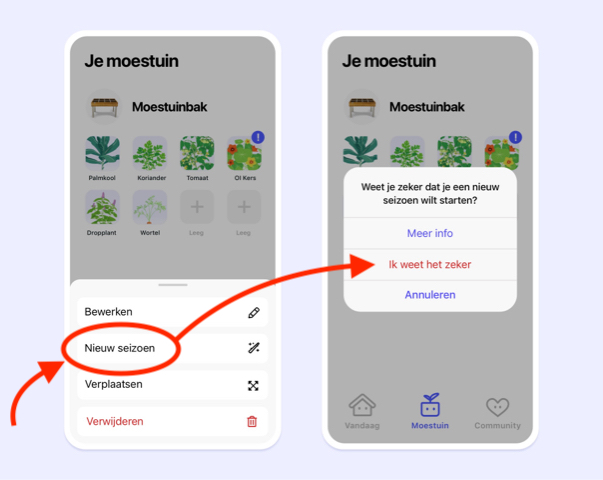
Tap the name of a raised bed and choose 'New season'. You'll get a pop-up where you confirm your choice:
If you used the MM app last year too, you probably already have a few raised beds in it. Even if they are empty now, last year's data is still attached to them: for example, which vegetable was last in a square.
But in your garden, you prepare the raised beds for a new season. You scoop the mix through the whole raised bed so it becomes nice and airy again. At the same time, you top up the plant food and add some fresh mix if your raised bed is no longer completely full. By mixing everything together, you're basically starting from scratch again, so it no longer matters what was in which square last year.
How do you show this in the app?
Tap the name of a raised bed and choose 'New season'. You'll get a pop-up where you confirm your choice:
Want to add a plant in the app that is already at a later stage? Here's how:
Tap the square where you want to put the plant. Choose the variety and tap 'Choose level' under the 'Sow' button. This opens the plant's timeline, where you choose the level that matches your plant. If needed, follow the instructions for that level to make sure you picked the right one.
Tap the square where you want to put the plant. Choose the variety and tap 'Choose level' under the 'Sow' button. This opens the plant's timeline, where you choose the level that matches your plant. If needed, follow the instructions for that level to make sure you picked the right one.
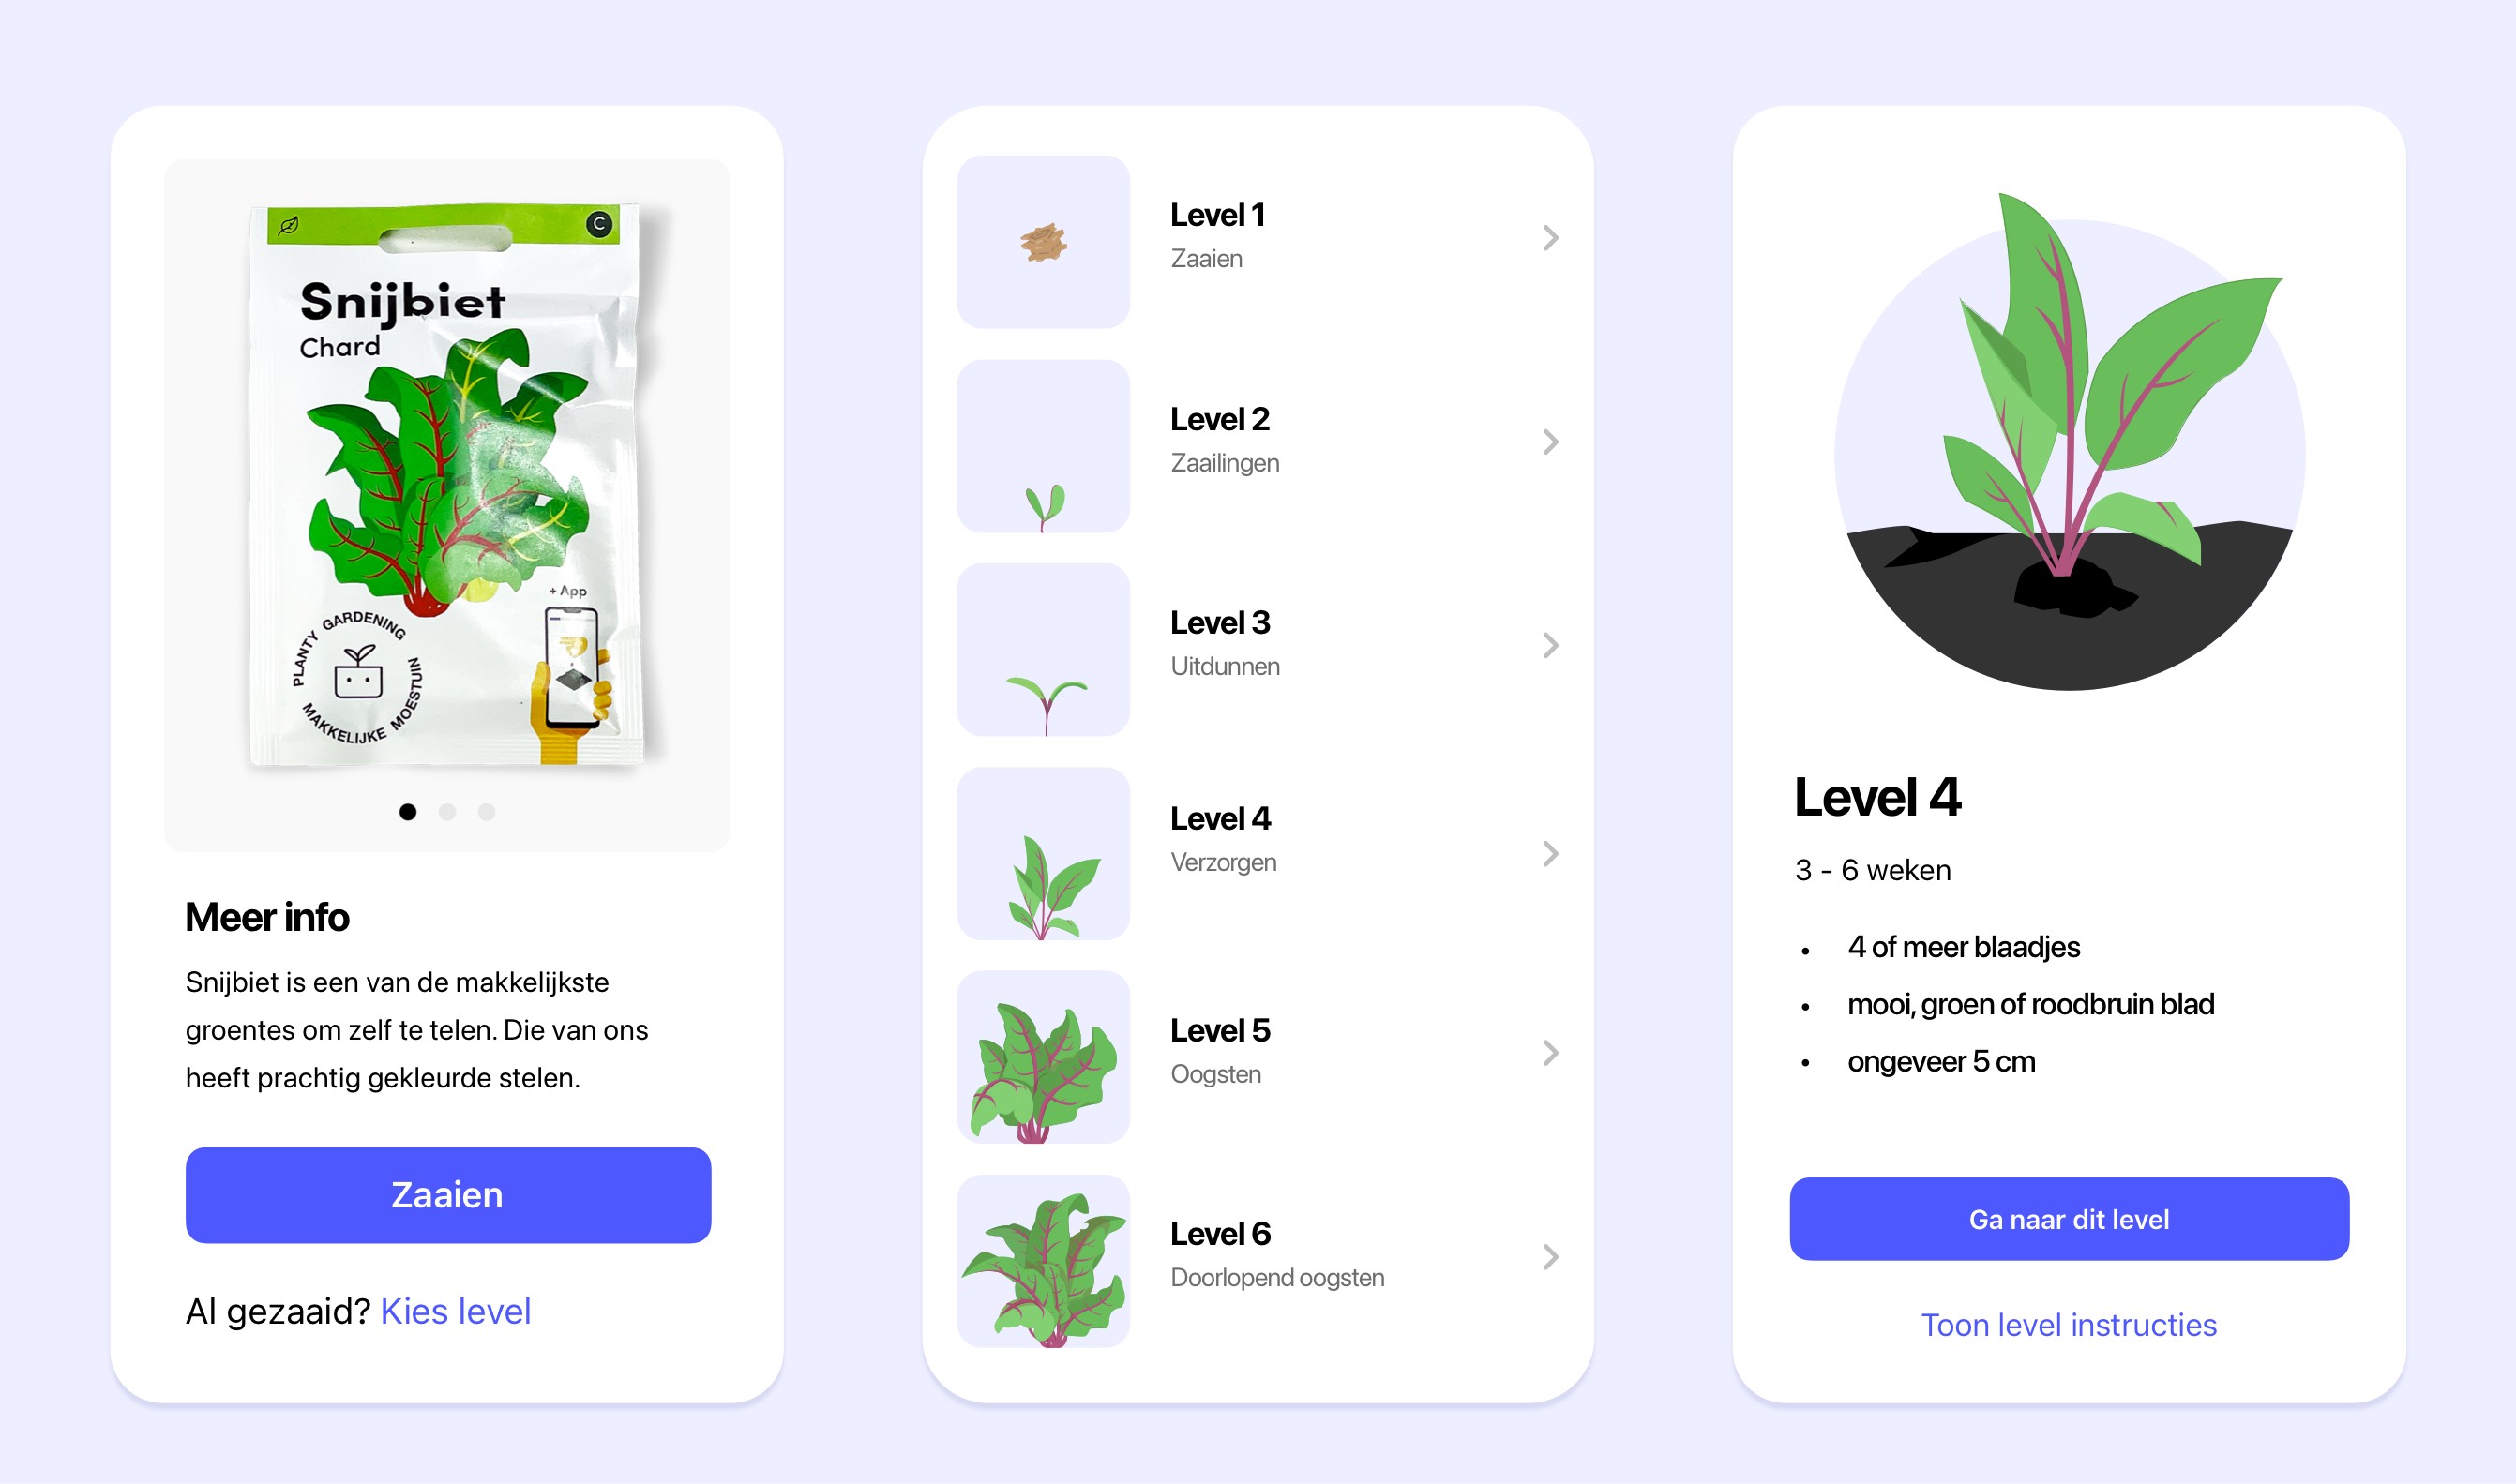
Tap the square with the plant you want to adjust. If there is an exclamation mark, do the checkup first and then tap the square again.
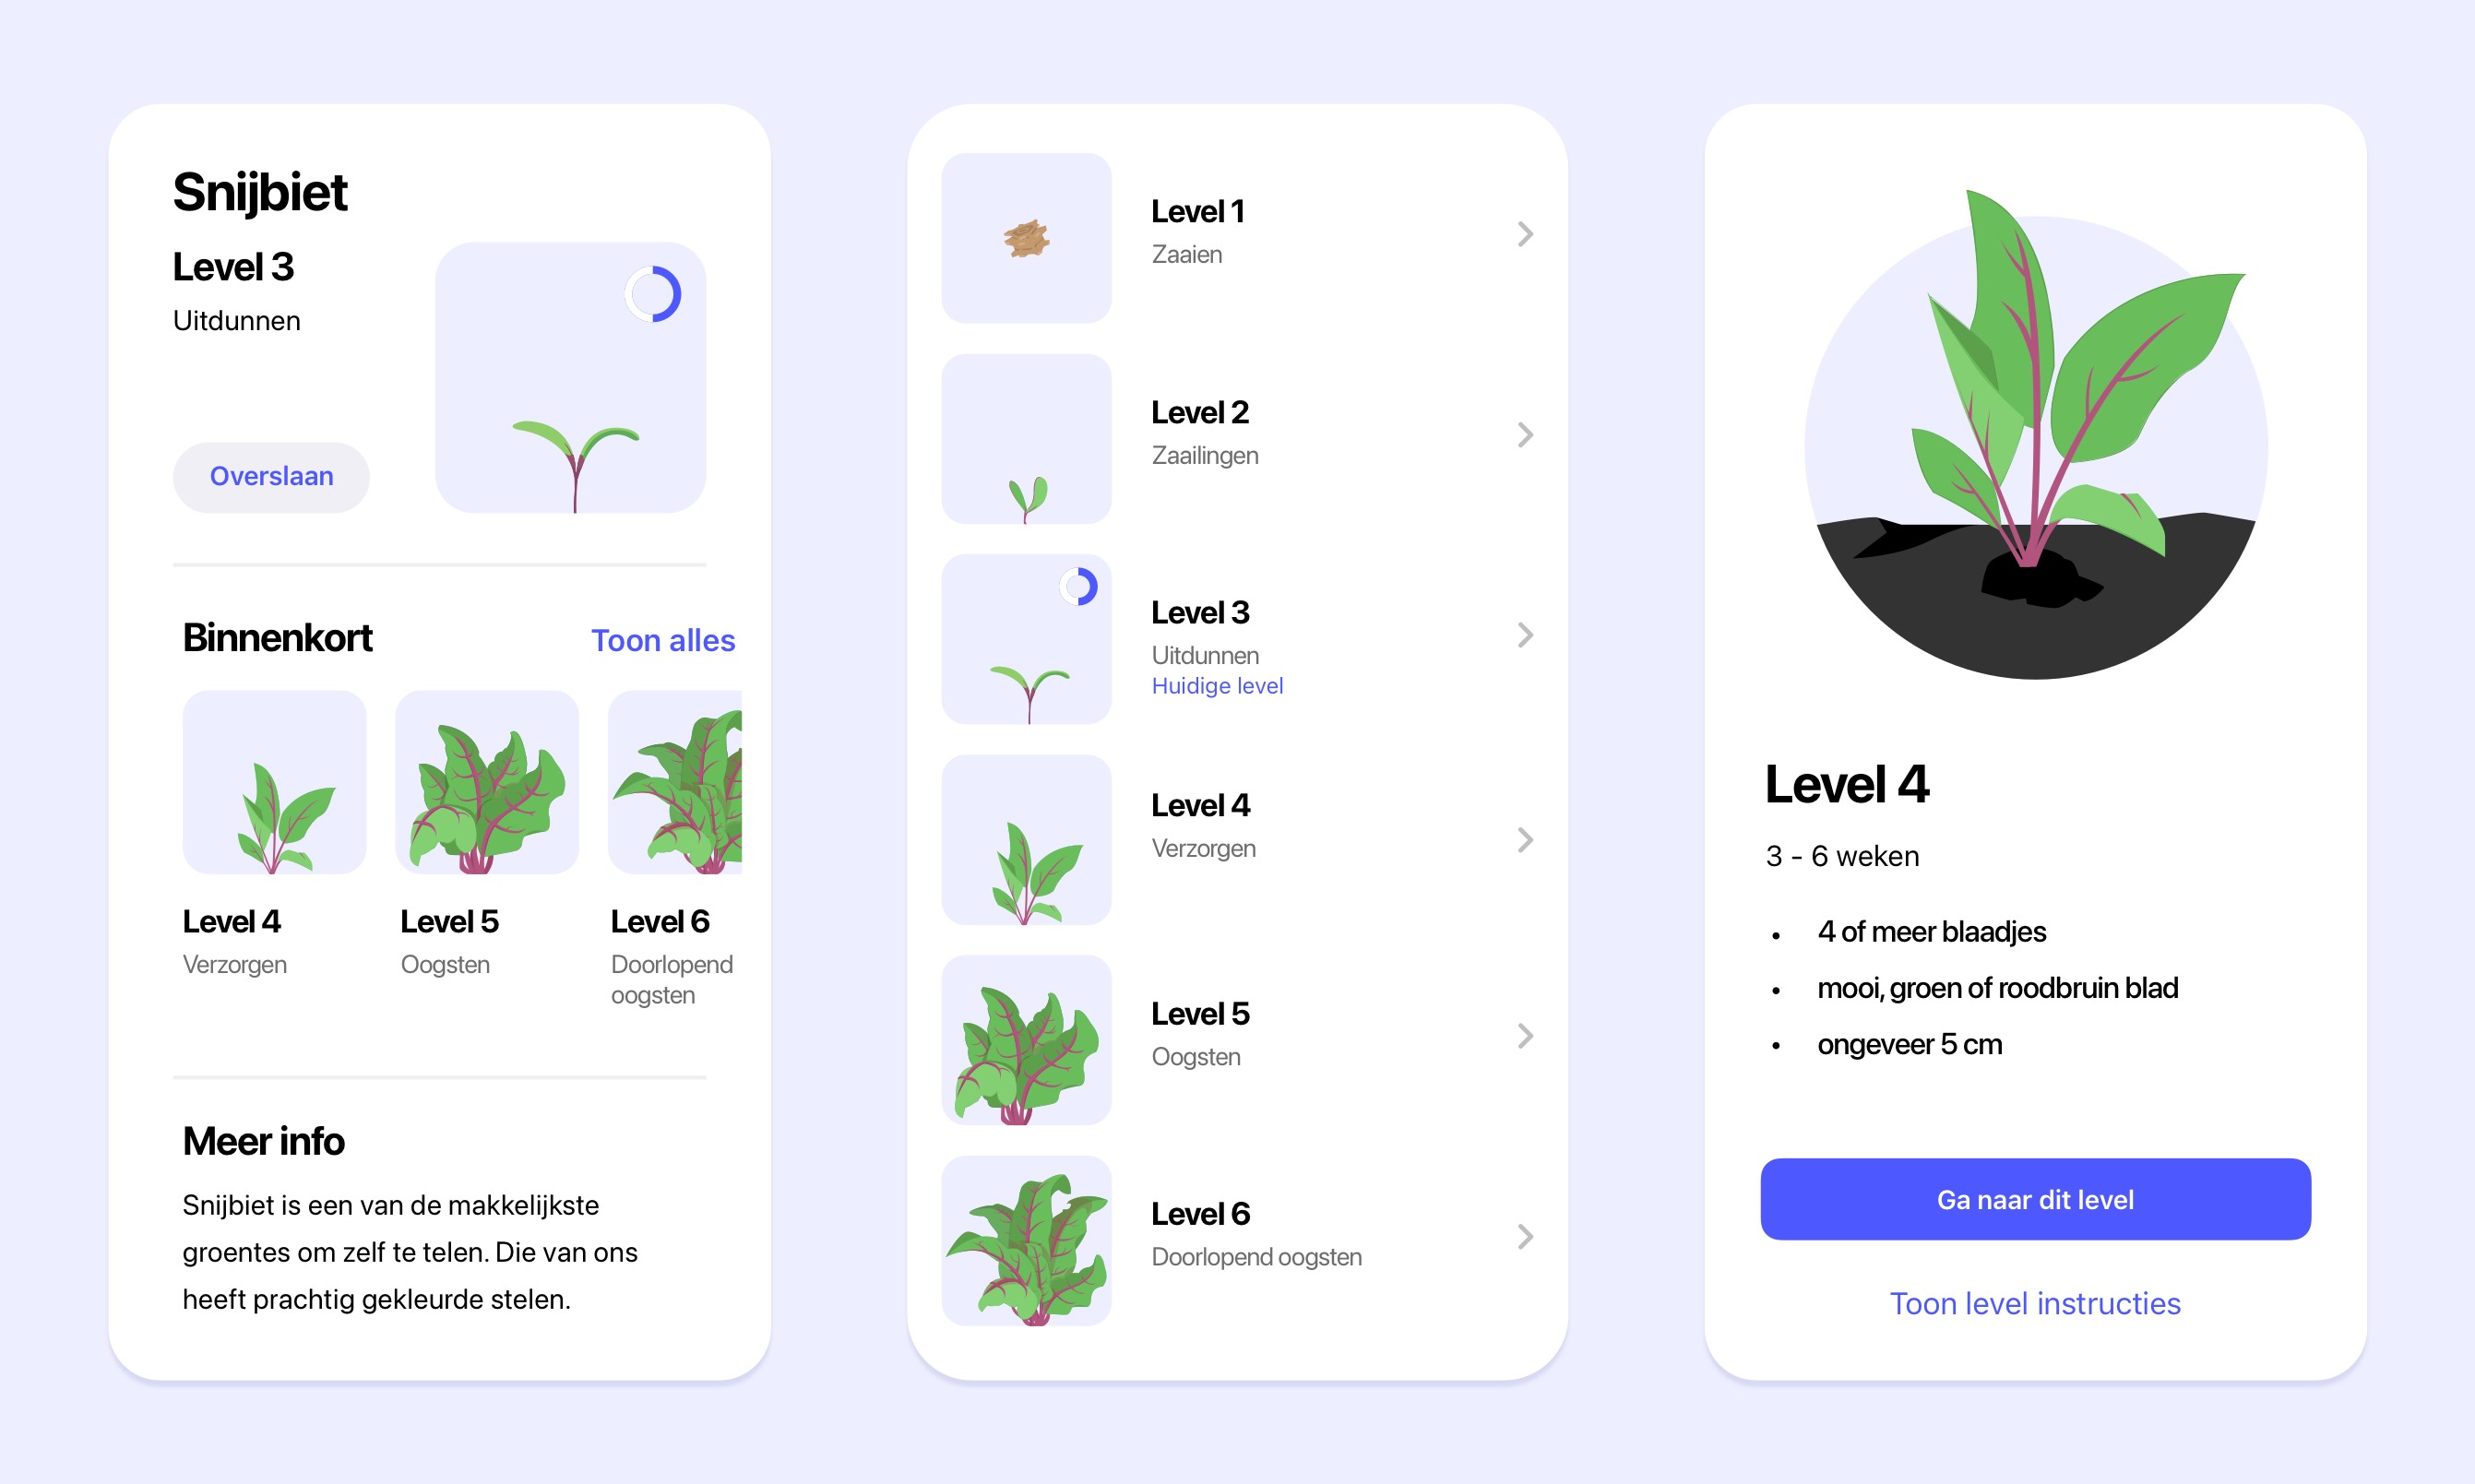
Now you'll see the plant's levels - see the left screen. The current level is at the top, with the upcoming levels below it. To the right of 'Upcoming' is the 'See all' button.
Tap it and you'll see the full timeline - see the middle screen. Choose the level you want for your plant.
Then you'll arrive at the right-hand screen. If needed, follow the matching instructions to make sure you chose the right level.
Now you'll see the plant's levels - see the left screen. The current level is at the top, with the upcoming levels below it. To the right of 'Upcoming' is the 'See all' button.
Tap it and you'll see the full timeline - see the middle screen. Choose the level you want for your plant.
Then you'll arrive at the right-hand screen. If needed, follow the matching instructions to make sure you chose the right level.
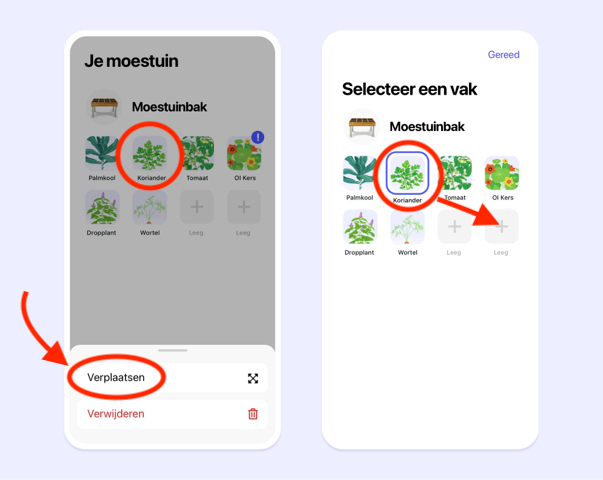
Press and hold the square with the plant you want to move. Choose 'Move', then tap the square where you want the plant to go:
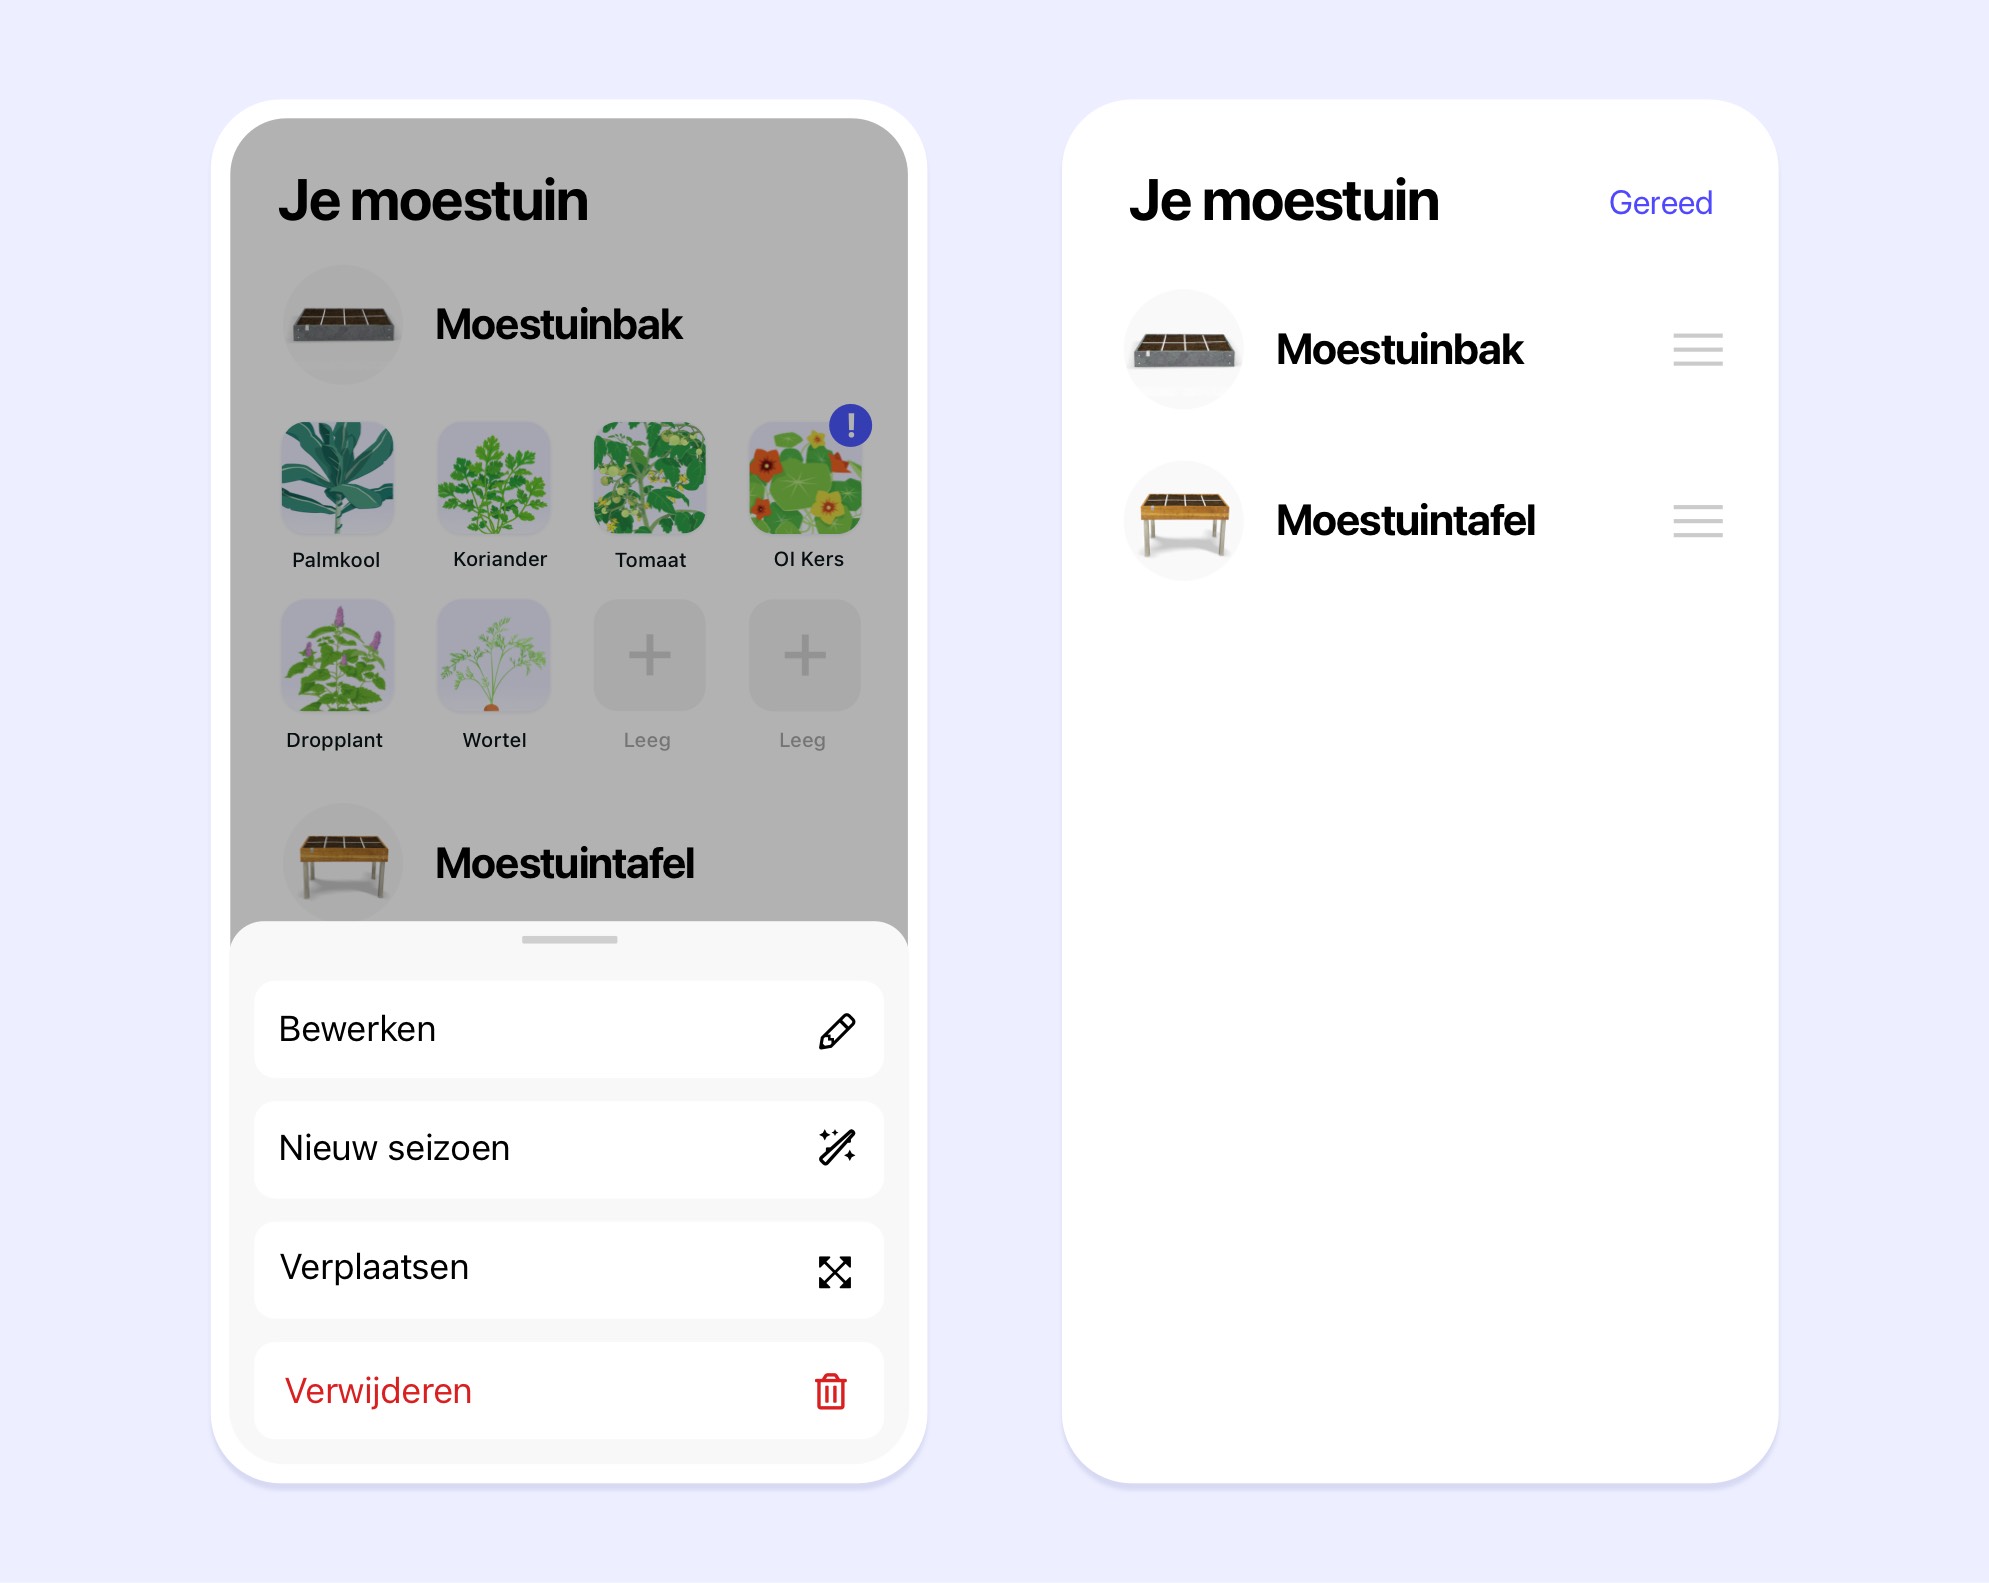
Yes. Tap the name of a raised bed and choose 'Move'.
Now hold your finger on the 3 lines next to the raised bed. You'll see it turn into a kind of bar that you can drag up or down: just drag it exactly where you want it.
Now hold your finger on the 3 lines next to the raised bed. You'll see it turn into a kind of bar that you can drag up or down: just drag it exactly where you want it.
Yes. Go to the square, tap it, and choose the vegetable you want to sow. Then tap 'Sow now' and after that 'Reserve'.
On the next screen, you can choose the day you want to receive a reminder to start sowing. If you don't choose a date, you'll get the reminder on the first day sowing is possible.
On the next screen, you can choose the day you want to receive a reminder to start sowing. If you don't choose a date, you'll get the reminder on the first day sowing is possible.
Yes. Tap the square and scroll all the way down in the seed list. Under 'Other', you'll see the option 'Custom plant'. Tap it and fill in the name on the next screen. You won't get messages or instructions for that square.
The app has 6 raised-bed sizes, plus the MM-minis. The app has all the right data for the squares in these raised beds: position, height, suitable seeds, and so on.
For now, we won't be adding more sizes. With these sizes, and a bit of creativity, you can make almost any other size by combining raised beds and/or blocking squares by reserving them. If that still doesn't work, please accept my humble apologies 😉
For now, we won't be adding more sizes. With these sizes, and a bit of creativity, you can make almost any other size by combining raised beds and/or blocking squares by reserving them. If that still doesn't work, please accept my humble apologies 😉
No, a trellis always goes on the north side of the raised bed. That's the best spot anyway, and the app is set up for that.
Absolutely. I use it myself too: it's really handy. But if you've been growing vegetables for a few years, you probably don't need the information in the chatbot anymore. Then you'll want to make your choice right away:
- just continue, with or without skipping the steps
- remove the plant, by pressing the square and choosing 'Remove'
- or wait a little longer and see how it goes: 'Delay'
The Delay button is at the top right of the screen: