Heat Today will be hot in the south of the Netherlands: up to 33 degrees! Check whether your reservoir is still full, whether the mix is still moist, shade vulnerable plants around midday, and wait with sowing until it cools down.
Standard Instruction + water reservoir
MM-hero or MM-bamboo
- Standard (raised garden bed on the ground)
- 4, 8, or 16 compartments
- With water reservoirs

⚠ WARNING ⚠
Want to add our trellis?
Then first follow steps 1 to 6 of How to attach your trellis. Do this before you go on to the steps below.
What's in the packages?
For this product, you received 3 packages. This is included:
Basic Package
Basic Package
- 4 boards of 66 cm
- 2 grid strips of 60 cm
- 1 butterfly screw
Connector Set
- 4 stainless steel corner pieces
- 16 bolts
- 16 nuts
Water Reservoirs
- 1 water reservoir of 60x60 cm
- 1 filling tube with cap
- 4 nylon wicks (or 2 ceramic wicks)
- 2 L-profiles
- 6 Torx screws
- Anti-root fabric
For this product, you received 3 packages. This is included:
Basic Package
- 2 side boards of 66 cm
- 2 side boards of 126 cm
- 3 grid strips of 60 cm
- 1 grid strip of 120 cm
- 3 butterfly screws
Connector Set
- 4 stainless steel corner pieces
- 16 bolts
- 16 nuts
Water Reservoirs
- 2 water reservoirs of 60x60 cm
- 2 filling tubes with caps
- 8 nylon wicks (or 4 ceramic wicks)
- 4 L-profiles
- 12 Torx screws
- Anti-root fabric
For this product, you received 3 packages. This is included:
Basic Package
Basic Package
- 2 side boards of 126 cm
- 6 grid strips of 120 cm
- 9 butterfly screws
Board Set
- 2 side boards of 126 cm
Connector Set
- 4 stainless steel corner pieces
- 16 bolts
- 16 nuts
Water Reservoirs
- 4 water reservoirs of 60x60 cm
- 4 filling tubes with caps
- 16 nylon wicks (or 8 ceramic wicks)
- 4 L-profiles
- 12 Torx screws
- 2 anti-root fabrics
What to get from your tool box:
- a wrench (size 13 or adjustable)
- Torx screwdriver or drill (TX25 bit)
- a hammer
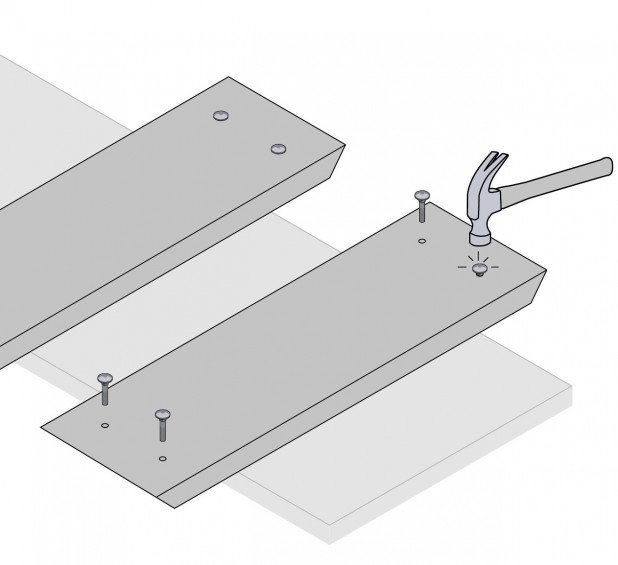
Step 1
Place all the boards on a raised surface with the longer corner side facing up.
Now grab the 16 bolts from the connector set and push them through the holes in the boards.
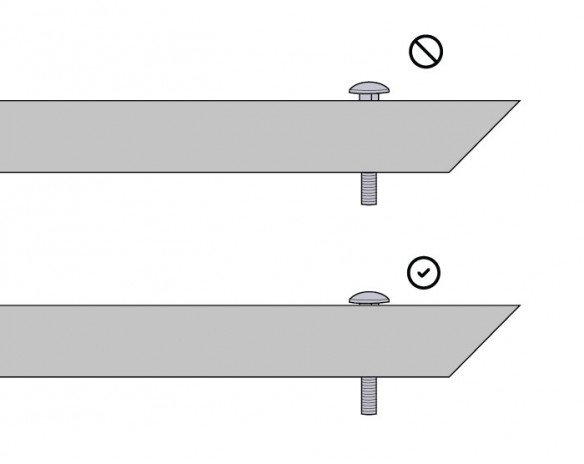
Then hammer them in nice and straight, including the square part of the bolt.
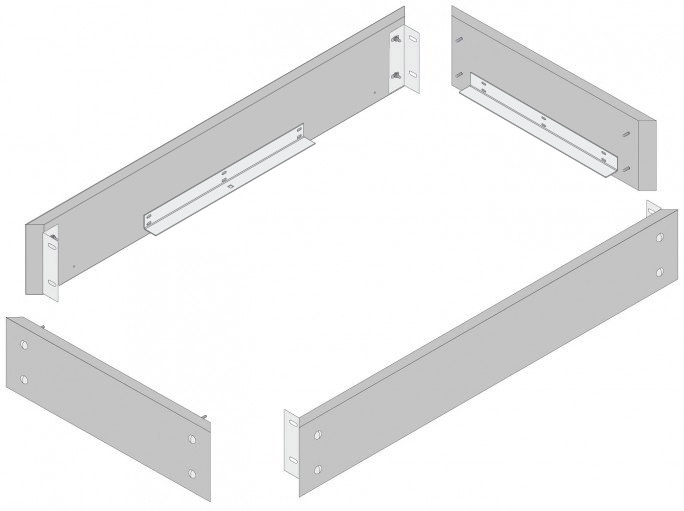
Step 2
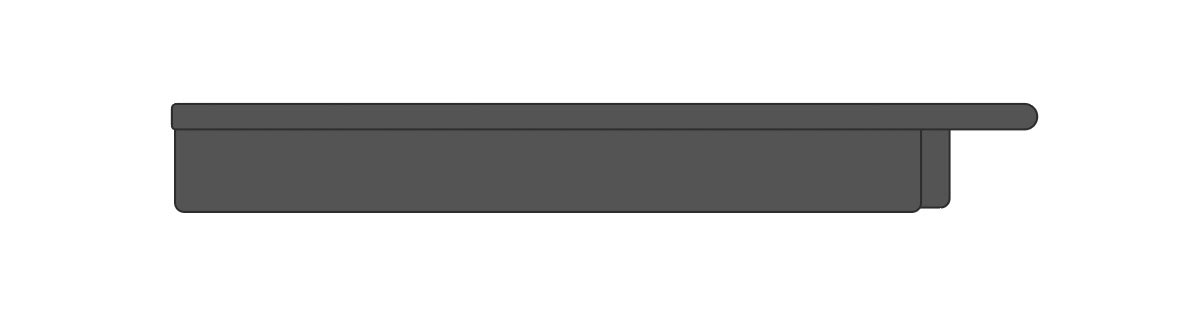
Turn the boards over. The short corner sides are now on top, and the bolts stick out at the top.
Take the screws from the bag and attach the L-profiles through the bottom holes on the boards with a screwdriver or drill (TX25 bit). The holes are already pre-drilled for this. Do not screw too far: tight is tight.
With the bamboo boards, this is somewhat more difficult because the material is harder than the recycled plastic. So, make sure to use a proper bit to avoid damaging the screws.
Tip: Place the boards on the cardboard from the packaging. This prevents potential damage to the boards.

Step 3
Then take the 4 stainless steel corner pieces from the connector set and attach them to the 2 longest boards.
Place them over the bolts and then screw the nut on by hand: not too tight yet.
After that, take the other boards and connect all the boards together. Again by hand and not too tight yet: there should still be a bit of play in the corners.
Place the box upright on a flat surface. Make sure the corners are as close together as possible.
Now tighten the bolts. First, do this as far as possible by hand and then tighten them further with a wrench a quarter turn. It does not have to be any tighter.
Do not tighten them with a drill. Once they're tightened, there's no going back.
Now tighten the bolts. First, do this as far as possible by hand and then tighten them further with a wrench a quarter turn. It does not have to be any tighter.
Do not tighten them with a drill. Once they're tightened, there's no going back.

⚠ ATTENTION ⚠
Are you putting our MM snail-repellent wire on this box right away?
Then first follow the steps for the MM snail-repellent wire before you continue.
Step 4
Choose a good spot to place the raised garden bed: with at least 6 hours of sunlight per day. Check if you can place your bed level there.
You can read more here about how to choose the best spot.
You can read more here about how to choose the best spot.
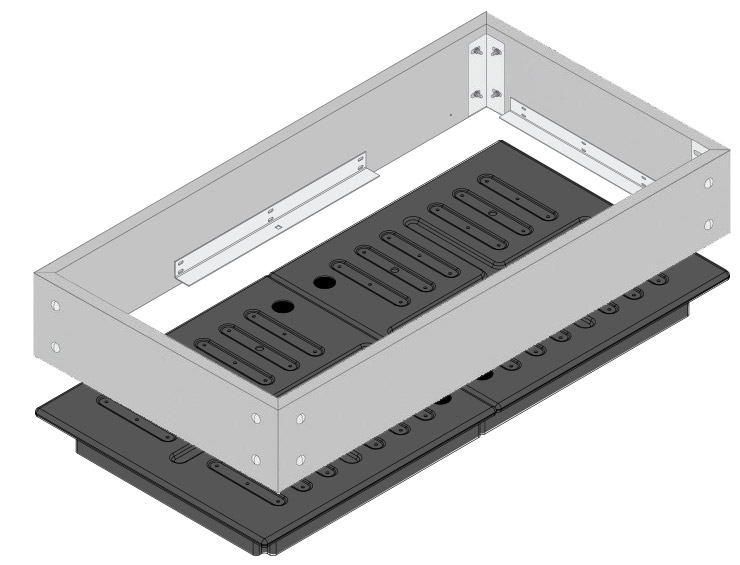
Place the water reservoirs on the ground next to each other, with the flat sides inward.
They don’t have to be 100% level, but if it’s tilted, less water will fit in the reservoirs.
They don’t have to be 100% level, but if it’s tilted, less water will fit in the reservoirs.
Now place the board frame on top of them. The L-profiles allow the bed to rest on the water reservoirs. Check carefully whether the frame encloses the water reservoirs and the whole structure sits stably.
Did you receive nylon wicks?
Stap 5
Push four wicks per water reservoir into the holes indicated below. Make a twisting motion while pushing the wicks through the hole.
Tip: Is it difficult? Then first push them through the holes with an awl/screwdriver.
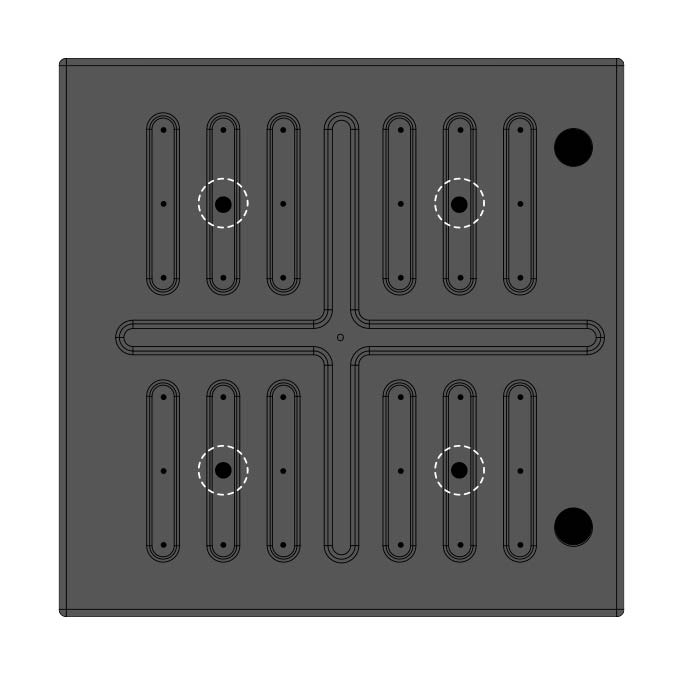
Did you receive ceramic wicks?
Push two ceramic rods per water reservoir into the holes indicated below.

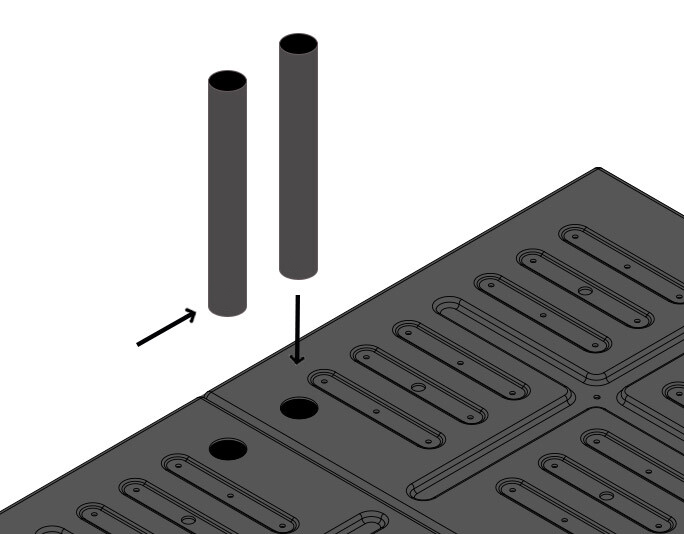
Step 6
Insert the filling tubes into the largest holes with a twisting motion and push them down to the bottom.
Tip: Is it difficult? Hold the bottom of the tube under hot running water or in a bowl of hot water for a moment. The tube will become slightly softer and slide into the hole more easily.
Step 7
Now place the included piece of anti-root fabric on the water reservoirs. It has 1 or 2 large holes that fit exactly over the filling tubes.
Does your bed have 16 compartments?
Then you received 2 anti-root fabrics. These overlap slightly in the middle.
Then you received 2 anti-root fabrics. These overlap slightly in the middle.

Step 8
Put a cap on each filling tube and fill the bed layer by layer with the mix, adding just enough water each time to make the mix properly moist—but not too wet.
⚠ CAUTION ⚠ It is very important to start with moist mix, as only then will it absorb water from the reservoir sufficiently. The wicking action of dry or dried-out mix is virtually nonexistent.
We also recommend adding perlite* to the mix.
This mix does not need to be replaced. If it compacts over time, you can top it up with some new MM-mix.
To maintain nutrient levels, use MM-Plantfood. If you use our app, it will automatically notify you when to do this.
Perlite is a natural volcanic rock that you can add to the MM-mix with the water reservoirs. These white granules make—and keep—the mix extra airy, drain excess water during heavy rainfall, and prevent the mix from compacting.
If you ordered the MM-mix along with the water reservoirs, you received a 5-liter bag per 4 compartments. If not, you can order the bags separately in the shop.
Use one 5-liter bag of perlite per 4 compartments - or 1 water reservoir. Sprinkle it over the mix and then mix it thoroughly so the perlite is evenly distributed. After that, you can sow your bed as usual.
By the way: using perlite is completely safe, both for nature and for you. So it’s also safe when it’s in the mix from which you harvest your vegetables.
By the way: using perlite is completely safe, both for nature and for you. So it’s also safe when it’s in the mix from which you harvest your vegetables.
Wormencompost wordt gemaakt door speciale compostwormen. Die zetten zetten organisch materiaal om in een fijne, kruimelige compost.
De grote kracht van wormencompost zit in het actieve bodemleven. Voeg je deze compost toe aan de kokosmix, dan komen dan komen daar direct miljarden nuttige micro-organismen in.
Vooral bij kokosmix is dat heel nuttig. Kokos blijft heerlijk luchtig en neemt water uitstekend op, maar bevat van zichzelf vrijwel geen bodemleven. En dat is juist wel nodig om de organische MM-voeding om te zetten zodat je planten dat makkelijk kunnen opnemen.
Nou komt dat bodemleven er vanzelf wel in als je mix gaat gebruiken, maar met de wormencompost voeg je dat al meteen toe. Daardoor komt de voeding sneller beschikbaar en hebben je planten daar eerder profijt van.
Vooral in het voorjaar en bij koud weer, voorkomt dat bij sommige planten wat vertraging in de groei.
Step 9
Once your bed is completely filled, you can fill the reservoirs with water. Keep filling until you see water overflowing from the holes on the side.
If you look into the filling tubes now, you can clearly see the water: like a shiny layer.
Step 10
Assemble the grid with the Chicago screws, then place it on top of the mix.
Finally, hang the logo clip on the side of the bed.
Done 🙂

What’s next?
From now on, water primarily through the filling tubes.
Always start by making the mix properly moist: dry mix barely draws up water.
After sowing
Due to sun and wind, the top layer of the mix dries out quite quickly. Therefore, after sowing, give a little extra water from above every day until the seedlings develop their first “true” leaves.
After that, the roots are long enough to reach the moist mix.
Keep the reservoir filled
Check once a week whether there is still water in the reservoir. To do this, look into the filling tube.
As soon as you no longer see water when looking into the filling tube, refill the reservoir. In dry weather, this is about once every 2 weeks. But if it rains frequently and heavily, you hardly need to do this.
If you find it difficult to check the water level through the filling tubes, you can also regularly top up the water until the tile overflows.
Monthly mix check
During prolonged periods of drought, sun, and heat, the mix can dry out from above. Therefore, check once a month whether the mix deeper down is still sufficiently moist.
If it isn’t, make it moist again by watering from above. But this won’t happen very often either.
Good luck!

Can the reservoirs withstand frost?
Absolutely. They are made of a fairly thick layer of plastic that doesn’t crack or break. Because the reservoirs are hollow—and thus somewhat flexible—it’s fine if frozen water pushes the walls slightly outward.
Absolutely. They are made of a fairly thick layer of plastic that doesn’t crack or break. Because the reservoirs are hollow—and thus somewhat flexible—it’s fine if frozen water pushes the walls slightly outward.
What is the difference between ceramic wicks and nylon wicks?
Nylon wicks are made from a piece of nylon cord with a knot tied in it. Ceramic wicks are specially baked to make them very hard and thus extra strong. They have a kind of widening at the top, so they don’t sink into the tile but also don’t stick out as much as the knots of the nylon wicks.
Nylon wicks are made from a piece of nylon cord with a knot tied in it. Ceramic wicks are specially baked to make them very hard and thus extra strong. They have a kind of widening at the top, so they don’t sink into the tile but also don’t stick out as much as the knots of the nylon wicks.
Both types absorb water equally well, but because the ceramic ones are thicker, you only need 2 instead of 4.
Do the wicks need to go through the anti-root fabric?
No, the anti-root fabric included with the reservoirs allows water to pass through very well. If you did put the wicks through the fabric, you might accidentally pull them out when you turn over the mix with your trowel.
No, the anti-root fabric included with the reservoirs allows water to pass through very well. If you did put the wicks through the fabric, you might accidentally pull them out when you turn over the mix with your trowel.
Do the caps need to stay on the tubes after filling the mix?
We don’t expect pests to fly into the water through the tube since it’s dark in there, but a stray slug could fall in. Therefore, it’s handy to always use the caps.
We don’t expect pests to fly into the water through the tube since it’s dark in there, but a stray slug could fall in. Therefore, it’s handy to always use the caps.