
Instruction manual: MM-Hero or MM-Bamboo garden table
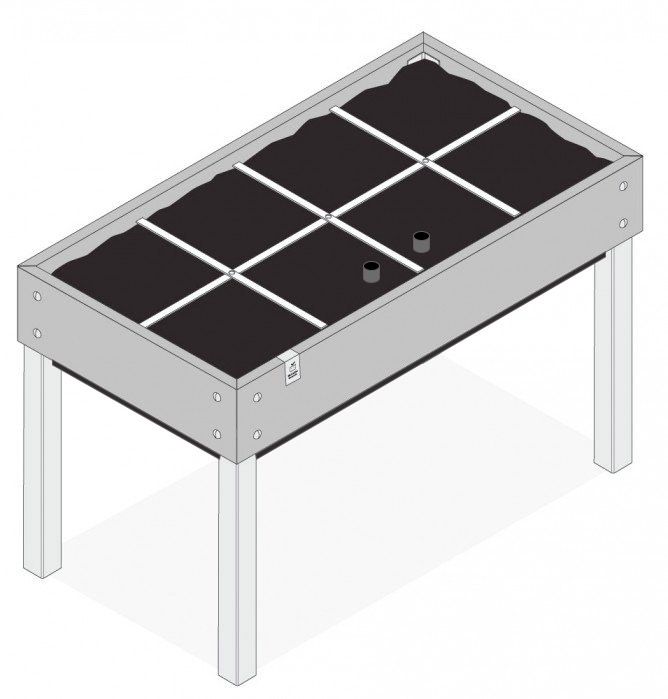
60x120 cm garden table with legs and bottom. These instructions work for your 120x120 cm table too.
⚠ Want to add a trellis?
Zet je ons klimrek op deze bak?
Then first follow steps 1 to 6 of How to attach your trellis. Do this before you go on to the steps below.
Wat zit er in je pakket(ten)?
Basics for 60x120 box
- 2 planks of 66 cm
- 3 sets of Chicago screws
- 3 grid strips of 60cm
- 1 grid strip of 120cm
- 1 weed mat
Additional plank set
- 2 planks of 126 cm
Connector set
- 16 bolts
- 16 nuts
- 16 washers
Base plate and legs set
- 4 stainless steel legs
- 2 stainless steel L-shaped profiles of 50cm
- 2 stainless steel L-shaped profiles of 110cm
- 1 steel base plate of 60x120cm
- 16 screws
Voor dit product kreeg je 4 pakketten. Dit zit erin:
Basispakket
Basispakket
- 2 zij-planken van 126 cm
- 6 rasterstrips van 120 cm
Plankenset
- 2 zij-planken van 126 cm
Poten set
- 4 poten van RVS
Waterreservoirs
- 4 waterreservoirs van 60x60cm
- 4 vulbuizen met doppen
- 16 nylon lonten
- 4 L-profielen
- 1 bodemstang
- 12 torx-schroeven
- 2 anti-worteldoeken
1 zakje met:
- 16 bouten
- 2 korte slotbouten
- 18 moeren
What to get from your tool box:
- a wrench (size 13 or adjustable)
- Phillips screwdriver or drill bit
- hammer
Tip: zet je bak in elkaar op de uiteindelijke plek
Het goed uitlijnen van een tafelbak is belangrijk en doe je ook het beste op de definitieve plek. Want wil je de hoeken van de planken mooi laten aansluiten, dan moet alles recht staan: de bak zelf maar vooral ook de poten. Doe je dat eerst op een andere plek en verplaats je dan je bak weer, dan moet je het uitlijnen nogmaals doen.
(Wat eventueel wel kan is de tafelbak elders monteren, de bouten nog niet helemaal strak aandraaien en het echte uitlijnen dan pas op de definitieve plek doen.)
(Wat eventueel wel kan is de tafelbak elders monteren, de bouten nog niet helemaal strak aandraaien en het echte uitlijnen dan pas op de definitieve plek doen.)
Montage:
Step 1
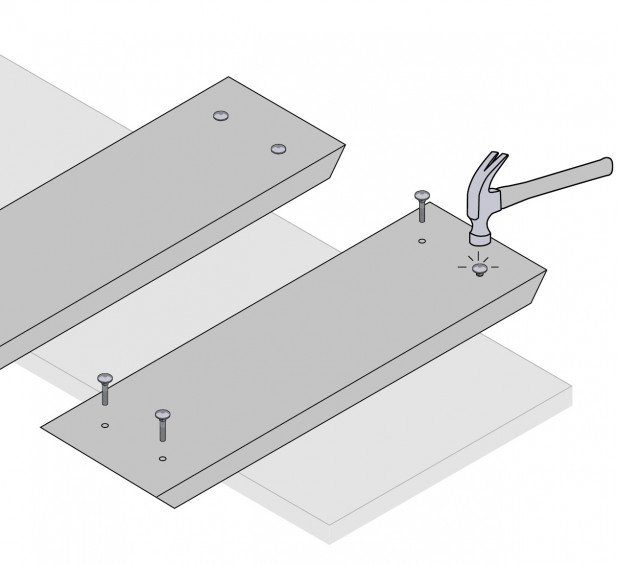
Place the planks with the long side up and elevated (between 2 sawhorses, for example). Remove the washers and nuts from the 8 long bolts.
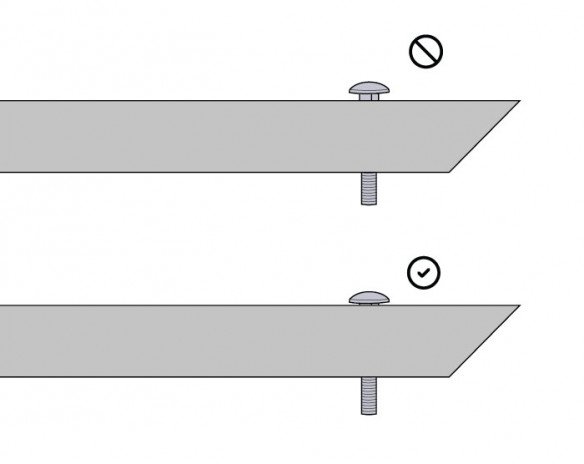
Put the bolts through the holes in all 4 planks and hammer them in. Do this carefully so that you hit the square part of the bolt into the plank.
Put the bolts through the holes in all 4 planks and hammer them in. Do this carefully so that you hit the square part of the bolt into the plank.
Step 2
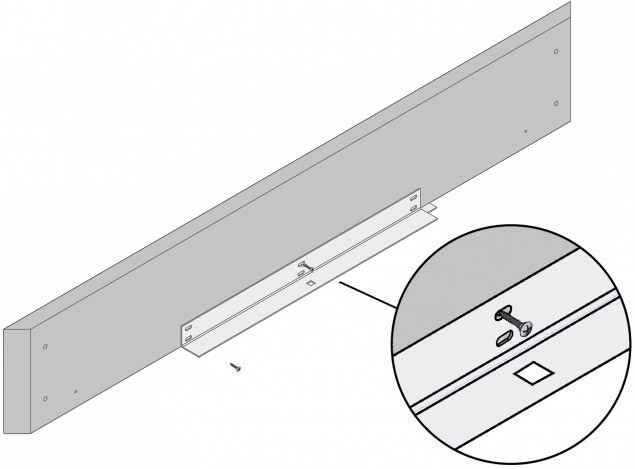
Using a screwdriver or drill, loosely screw the L-profiles onto the planks at the pre-drilled holes. Don't screw them in too tightly. Once they're secured, there's no going back 😉
This is more difficult with MM-Bamboo planks because the material is harder than that of the MM-Hero. When using a drill, it's very important that you use a suitable bit. This will prevent you from breaking the screw.
This is more difficult with MM-Bamboo planks because the material is harder than that of the MM-Hero. When using a drill, it's very important that you use a suitable bit. This will prevent you from breaking the screw.
Step 3
Secure the 4 planks to each other using the legs and bolts. (For the 120x120 cm garden table, use the longer bolts provided).
First, put the bolt through the hole in the plank, starting from the outer side. Then loosely attach the steel leg with the washer and nut.
First, put the bolt through the hole in the plank, starting from the outer side. Then loosely attach the steel leg with the washer and nut.
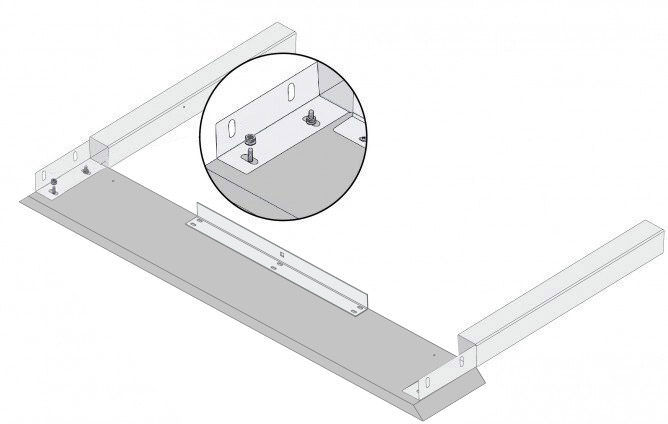
Step 4
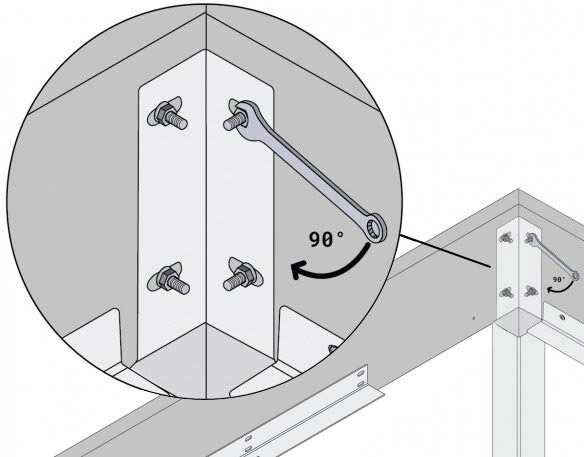
Put the garden box upright on a flat surface. Make sure the corners are as close together as possible and straighten the legs - if necessary, use your hammer.
Now tighten the bolts. First, as far as possible by your hand and then tighten them a quarter turn further with a wrench. It doesn't have to be any tighter.
Do not tighten them super tight, and definitely don't use a drill.
Now tighten the bolts. First, as far as possible by your hand and then tighten them a quarter turn further with a wrench. It doesn't have to be any tighter.
Do not tighten them super tight, and definitely don't use a drill.
Alleen voor tafel met 16 vakken:
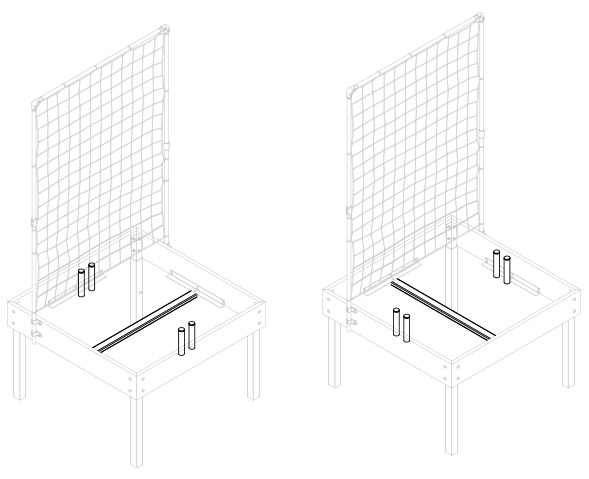
Bepaal eerst de plaats voor de onderstang.
Wil je de vulbuizen aan de voor- en achterkant van je bak? Dan moet de stang van links naar rechts lopen. Wil je de vulbuizen juist aan de linker- en rechterkant van je bak, dan komt de stang van voor naar achter.
De plek van de buizen is vooral belangrijk bij een bak met een klimrek. Is dat op dezelfde plek als het klimnet, dan zitten ze elkaar al snel in de weg bij het aanvullen van het water.
Wil je de vulbuizen aan de voor- en achterkant van je bak? Dan moet de stang van links naar rechts lopen. Wil je de vulbuizen juist aan de linker- en rechterkant van je bak, dan komt de stang van voor naar achter.
De plek van de buizen is vooral belangrijk bij een bak met een klimrek. Is dat op dezelfde plek als het klimnet, dan zitten ze elkaar al snel in de weg bij het aanvullen van het water.
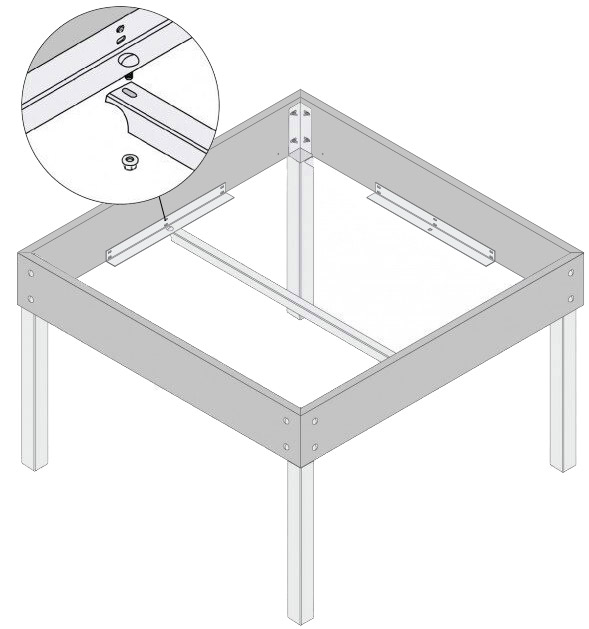
Maak de vierkante onderstang met de korte slotboutjes vast aan 2 van de 4 L-profielen.
⚠ LET OP ⚠
Zet je meteen ons MM-slakkenschrikdraad op deze bak?
Dan is het verreweg het makkelijkst om dat nu al te monteren. Hier vind je de instructies voor het MM-slakkenschrikdraad.
Stap 4
Pak dan de waterreservoirs. Elk reservoir heeft drie zijdes die op de L-profielen (en onderstang bij 16 vakken) komen te rusten. De vierde zijde is vlak en wijst naar binnen.
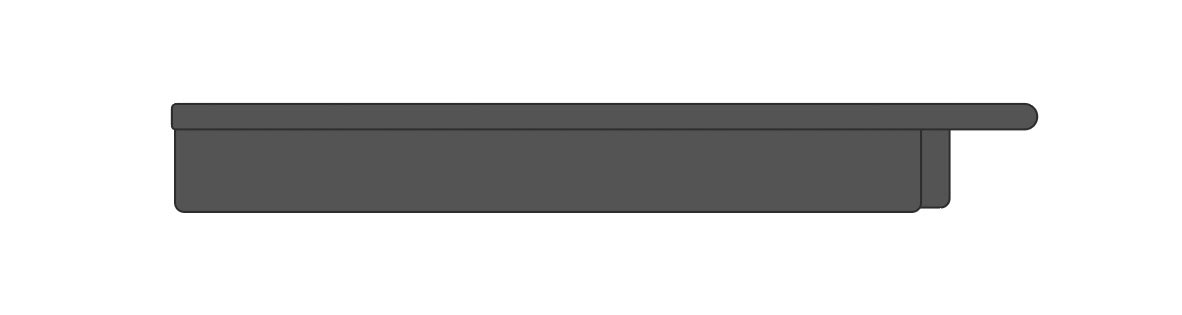
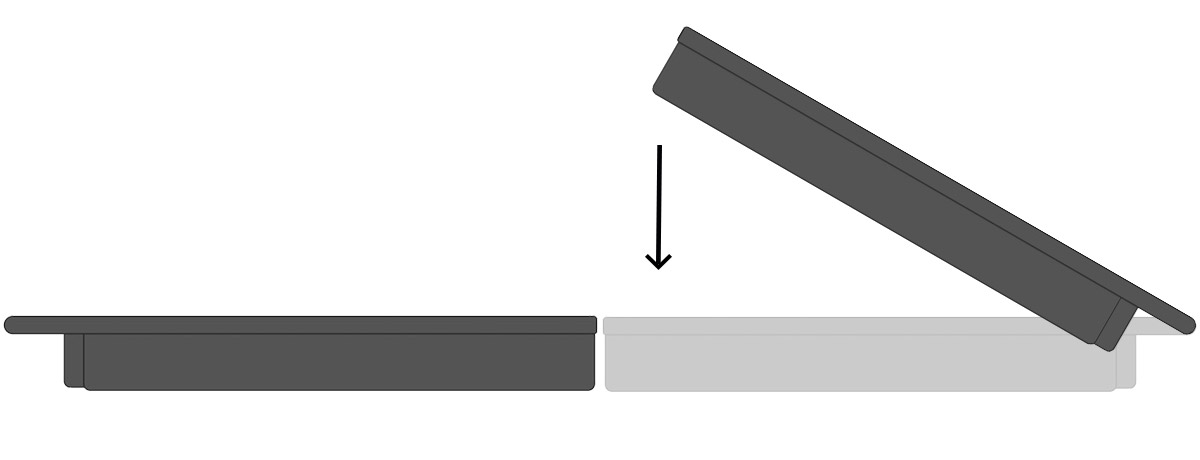
Plaats het eerste reservoir op de L-profielen (en de eventuele onderstang) en schuif het helemaal tegen de kant van de bak zodat je genoeg ruimte hebt om de andere ernaast te leggen.
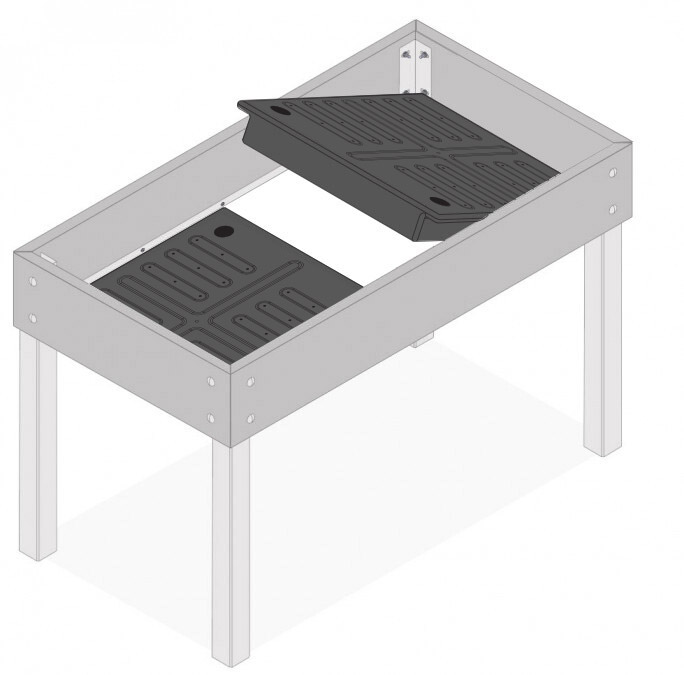
Verschuif ze daarna zó tot de ruimte tussen de reservoirs en de planken overal hetzelfde is.
Stap 5
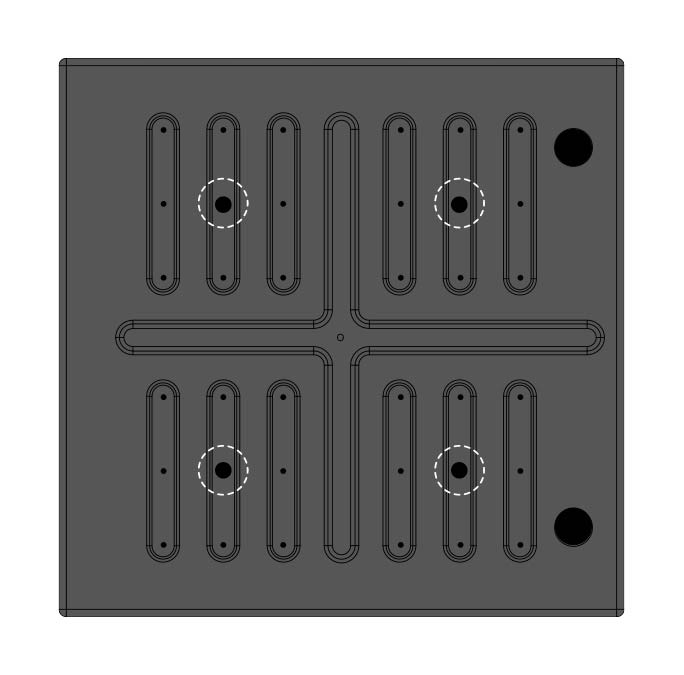
Lay the base plates along the bottom of the garden table. Put the plates perpendicular to the base bar, as shown above.
Step 6
Put your garden table upright on a flat surface. Attach the square base bar to 2 of the L-profiles using the short carriage bolts, as shown below.
Step 8
Place the weed mat on the bottom of the garden table. Fold the edges up a bit if needed.
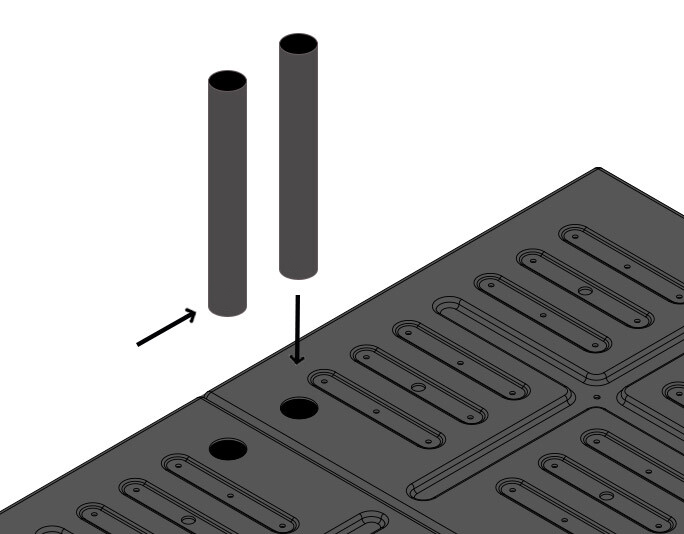
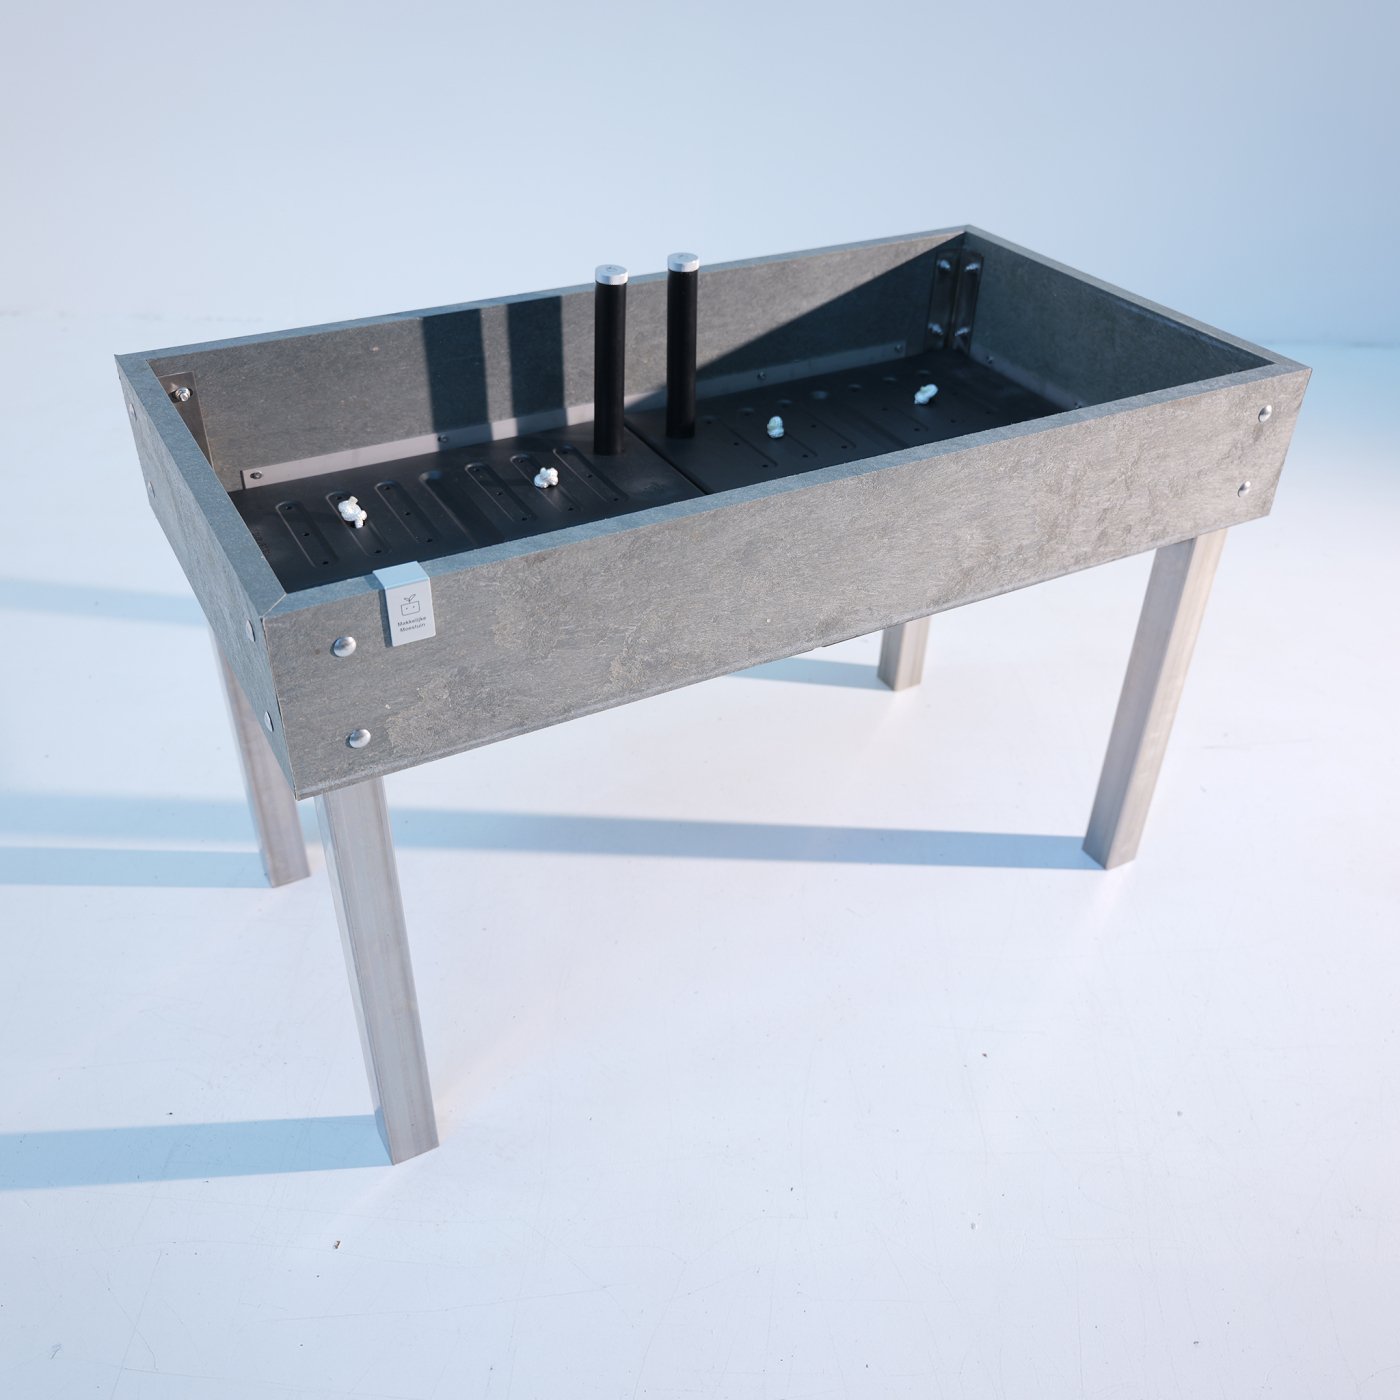
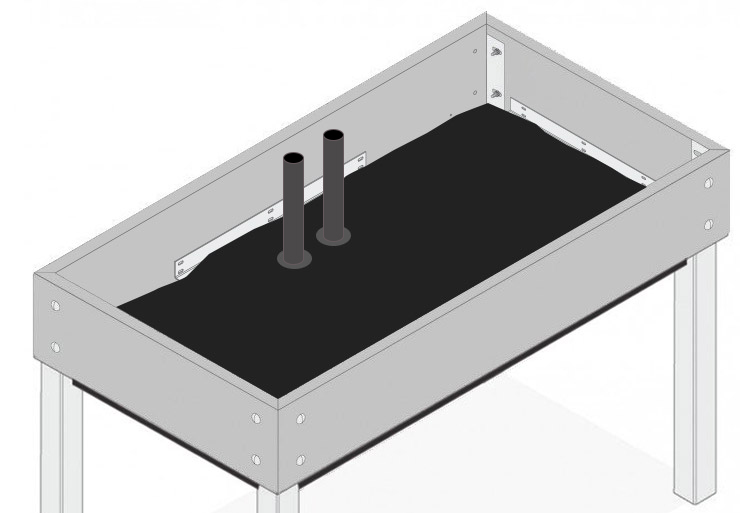
Stap 7
Pak het worteldoek erbij. Op het worteldoek staan kruisjes. Snijd twee naast elkaar liggende kruisjes in op de plek die voor jou het handigst is om straks de reservoirs aan te vullen.. Leg nu het bijgeleverde dikke en zwarte anti-worteldoek op de bak en druk de vulbuizen door de ingesneden kruisjes.
Heeft je bak 16 vakken?
Dan kreeg je 1 grote worteldoek met 8 kruisjes. Alweer: kies de plek die voor jou het handigst is. Het is bijvoorbeeld echt niet handig als de vulbuizen bij een klimrek komen.
Dan kreeg je 1 grote worteldoek met 8 kruisjes. Alweer: kies de plek die voor jou het handigst is. Het is bijvoorbeeld echt niet handig als de vulbuizen bij een klimrek komen.
Step 7
Find a good spot for your garden table. You need a sunny area that gets at least 6 hours of sunlight.
You can read more here about how to choose the best spot.
Adding a trellis? Then make the trellis side the northern side of your garden table. This prevents tall climbing vegetables from overshadowing your other plants.
You can read more here about how to choose the best spot.
Adding a trellis? Then make the trellis side the northern side of your garden table. This prevents tall climbing vegetables from overshadowing your other plants.
Perliet is een natuurlijk vulkanisch gesteente dat je kunt toevoegen aan de MM-mix bij de waterreservoirs. Deze witte korreltjes maken - en houden - de mix extra luchtig, voeren bij heftige regenval het teveel aan vocht af, en voorkomen dat de mix in elkaar zakt.
Bestelde je gelijk met de waterreservoirs ook de MM-mix, dan kreeg je waarschijnlijk zo'n 5-liter zakje meegeleverd. Deed je dat niet, dan kun je de zakjes los bestellen in de shop.
Strooi het over de mix en meng het geheel dan goed door elkaar, zodat de perliet mooi verdeeld is. Daarna kun je je bak gewoon inzaaien.
Het gebruik van perliet is absoluut veilig, zowel voor de natuur als voor jou. Ook als het in de mix zit waaruit jij de groentes oogst.
Bestelde je gelijk met de waterreservoirs ook de MM-mix, dan kreeg je waarschijnlijk zo'n 5-liter zakje meegeleverd. Deed je dat niet, dan kun je de zakjes los bestellen in de shop.
Strooi het over de mix en meng het geheel dan goed door elkaar, zodat de perliet mooi verdeeld is. Daarna kun je je bak gewoon inzaaien.
Het gebruik van perliet is absoluut veilig, zowel voor de natuur als voor jou. Ook als het in de mix zit waaruit jij de groentes oogst.
Wormencompost wordt gemaakt door speciale compostwormen. Die zetten zetten organisch materiaal om in een fijne, kruimelige compost.
De grote kracht van wormencompost zit in het actieve bodemleven. Voeg je deze compost toe aan de kokosmix, dan komen dan komen daar direct miljarden nuttige micro-organismen in.
Vooral bij kokosmix is dat heel nuttig. Kokos blijft heerlijk luchtig en neemt water uitstekend op, maar bevat van zichzelf vrijwel geen bodemleven. En dat is juist wel nodig om de organische MM-voeding om te zetten zodat je planten dat makkelijk kunnen opnemen.
Nou komt dat bodemleven er vanzelf wel in als je mix gaat gebruiken, maar met de wormencompost voeg je dat al meteen toe. Daardoor komt de voeding sneller beschikbaar en hebben je planten daar eerder profijt van.
Vooral in het voorjaar en bij koud weer, voorkomt dat bij sommige planten wat vertraging in de groei.
De grote kracht van wormencompost zit in het actieve bodemleven. Voeg je deze compost toe aan de kokosmix, dan komen dan komen daar direct miljarden nuttige micro-organismen in.
Vooral bij kokosmix is dat heel nuttig. Kokos blijft heerlijk luchtig en neemt water uitstekend op, maar bevat van zichzelf vrijwel geen bodemleven. En dat is juist wel nodig om de organische MM-voeding om te zetten zodat je planten dat makkelijk kunnen opnemen.
Nou komt dat bodemleven er vanzelf wel in als je mix gaat gebruiken, maar met de wormencompost voeg je dat al meteen toe. Daardoor komt de voeding sneller beschikbaar en hebben je planten daar eerder profijt van.
Vooral in het voorjaar en bij koud weer, voorkomt dat bij sommige planten wat vertraging in de groei.
Step 9
Fill your garden box with MM-Mix. Make the soil mix damp - but not soaking wet - and loosen it up with a garden spade.
The soil mix is so good, you don't need to replace it. If it gets more compact over time, you can top it off with more mix. To keep it rich, you'll add some nutrients once in a while - MM-Plantfood. The app will tell you when to give it this extra boost.
The soil mix is so good, you don't need to replace it. If it gets more compact over time, you can top it off with more mix. To keep it rich, you'll add some nutrients once in a while - MM-Plantfood. The app will tell you when to give it this extra boost.
Step 11
Lay the grid loosely on top of the soil mix.
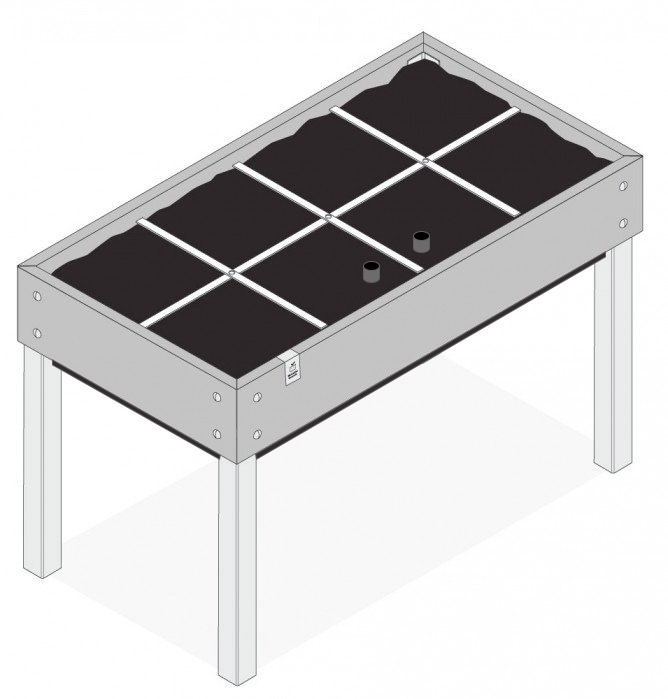
Hoe gaat het verder?
Now your garden table is ready for sowing and planting.
Have fun!
Have fun!

Kunnen de reservoirs tegen vorst?
Jazeker. Ze zijn gemaakt van een vrij dikke laag plastic die iets flexibel is. Omdat de reservoirs hol zijn, geeft het dus niets als het bevroren water de wanden iets naar buiten drukt.
Wat is het verschil tussen de keramische lonten en die van nylon?
De lonten van nylon zijn gemaakt van een stuk nylon koord waar wij nog een knoop inleggen. De keramische lonten zijn op een speciale manier gebakken waardoor ze keihard worden en dus extra sterk. Daar zit bovenaan een soort verbreding waardoor hij niet in de tegel zakt maar ook niet zoveel uitsteekt als de knopen van de nylon lonten.
Beide soorten zuigen het water even goed op, maar omdat de keramische dikker zijn, heb je er daar maar 2 van nodig in plaats van 4.
Uiteindelijk stappen we helemaal over op de keramische lonten, maar omdat de productie van de keramische lonten nogal lang duurt, leveren we in de tussentijd beide soorten uit.
Moeten de lonten niet door het anti-worteldoek heen?
Nee, het doek laat het vocht heel goed door. Zou je de lonten wél door het doek halen, dan heb je ook kans dat je ze per ongeluk meetrekt als je met je schepje de mix omschept.
De lonten van nylon zijn gemaakt van een stuk nylon koord waar wij nog een knoop inleggen. De keramische lonten zijn op een speciale manier gebakken waardoor ze keihard worden en dus extra sterk. Daar zit bovenaan een soort verbreding waardoor hij niet in de tegel zakt maar ook niet zoveel uitsteekt als de knopen van de nylon lonten.
Beide soorten zuigen het water even goed op, maar omdat de keramische dikker zijn, heb je er daar maar 2 van nodig in plaats van 4.
Uiteindelijk stappen we helemaal over op de keramische lonten, maar omdat de productie van de keramische lonten nogal lang duurt, leveren we in de tussentijd beide soorten uit.
Moeten de lonten niet door het anti-worteldoek heen?
Nee, het doek laat het vocht heel goed door. Zou je de lonten wél door het doek halen, dan heb je ook kans dat je ze per ongeluk meetrekt als je met je schepje de mix omschept.
Moeten de doppen ook na het vullen van de mix op de buizen blijven?
We verwachten niet dat er ongedierte door de buis naar het water zal vliegen - het is daar immers donker - maar een verdwaalde slak kan er wel invallen. Daarom is het handig om de doppen altijd te gebruiken.